How to Build it; Custom Gaming Table

IMG_20180812_175829.jpg

For the past year and a half, once a week I have a bunch of friends over to my house for a weekly game night where we all get together and play Dungeons and Dragons. Because we're f*%#ing cool. Our group is fairly large with seven players and myself as the dungeon master (I know, I know, hes a dungeon master for a weekly D&D game? Tame the pitter-patter of your fluttering hearts and calm the rush of blood to your nethers, I'm taken). With such a large group, we need quite a bit of space, which for the past 18 months has meant my dining room table.

While everyone does fit around this table, it gets a little elbowy with all seven people plus all of their books and notes and stuff taking up positions around the table. That's before you even account for me with all of my DM shit taking up a chunk of surface area. While that's mostly bearable, the main thing is that between my source books, miniatures, campaign binders, props (yes I have props, I run an immersive game, f*%k you), and other assorted things; when the table is not being used for gaming I have to move approximately 180,000,000 lbs of shit out of there if I want to use the room for anything else.

I decided that it was for the best if I actually set up a space to be a designated game room. We've got a room downstairs in our house where we've been steadily moving all of our hand-me-down/thrift store furniture as we replace it with newer, less decrepit things to the point where it's become this weird hybrid room with a junky dining room set, a couch and chair from 1992 and a terrible rug. Also I accidentally painted it basketball orange so. . .

If we got rid of the garbage furniture, repainted the walls and furnished it with stuff that made some semblance of sense, we could have a really nice game room/place to entertain. The centerpiece and focal point of this room, would of course be the gaming table.

I had an idea what I wanted, which was a fairly simple table, preferably kind of rustic/taverny looking that had removable table-top slats to reveal a gaming pit underneath so that the piece could do double duty as a normal table when not in use for D&D. With my general vision in mind I did some shopping around online, finding that unless I wanted to spend upwards of $1,000 I was out of luck. On top of that, the options I found that were remotely reasonable in cost were not what I was looking for aesthetically speaking.

Now, I won't name any companies specifically, but I'll just say that if i'm going to get a gaming table that is to be considered in any way ultimate, it's sure as sh!t not going to be some Ikea looking piece of crap. If I'm going to have a sh%t gaming table, I'll spend 200 bucks and make it my damned self.

The following is the process of building my custom gaming table, with notes and descriptions of what I did, in case anyone reading is interested in building one for themselves:


The first thing I did was search around on the internet for plans for a gaming table build. Like I said, I had a general idea that I needed a fairly large, rectangular table with a gaming pit set down into the surface and panels of some sort that could be put in and taken out to convert it to a regular table when not in use, no break down of my game setup required.

I found a set of plans that seemed fairly popular for people doing home builds of tables, which I will link to at the end so you can use that as an additional resource if you are trying to recreate this build. The only issues I had with the plans and walkthrough video that the original creator put together was that they were a little vague about certain details, missing measurements in some places and the table he was building was only 4X4, and had a monitor mounted in it. Needing a larger table and not really being a digital map/computer screen kind of DM, some modifications would need to be made, along with a fair bit of just f*#@ing winging it. I never claimed to be a competent carpenter, I think it's important that you remember that.

I went through his plans, watched his walkthrough a couple of times while taking notes, and assembled my materials list based on what I thought I'd need to build his same style table at the dimensions I wanted. Here is what I came up with:

  • (2x) 1"x6"x8'*

  • (2x) 1"x6"x6'*

  • (4x) 1"x4"x8'*

  • (4x) 1"x4"x4'

  • (3x) 3/4"x3/4"x6' quarter round

  • (10x) 2"x4"x8'

  • (5x) 1"x8"x6*

  • 4'x6'x3/4" plywood

*try to get the higher quality, smoother, straighter cuts of lumber for these items as they are the parts of the table that will be visible, and it's important that they not be warped. It will save you a lot of effort sanding and prepping as well if some of that is done for you.

My additional materials list included these items:

  • Wood glue (large)

  • Wood filler (stainable)

  • (8x) 2 1/2" lag bolts

  • 1 5/8" screws

  • 2 1/2" screws

  • finish nails

  • 120 and 220 grit sandpaper

  • wood stain (color of choice)

  • wood pre-stain

  • Spar-Urethane (1g)

Tools I used:

  • Handheld circular saw

  • Table Saw

  • Jig saw

  • Corded Drill

  • tape measures, levels, straight edges

Tools that I didn't have but would have been good: Miter saw


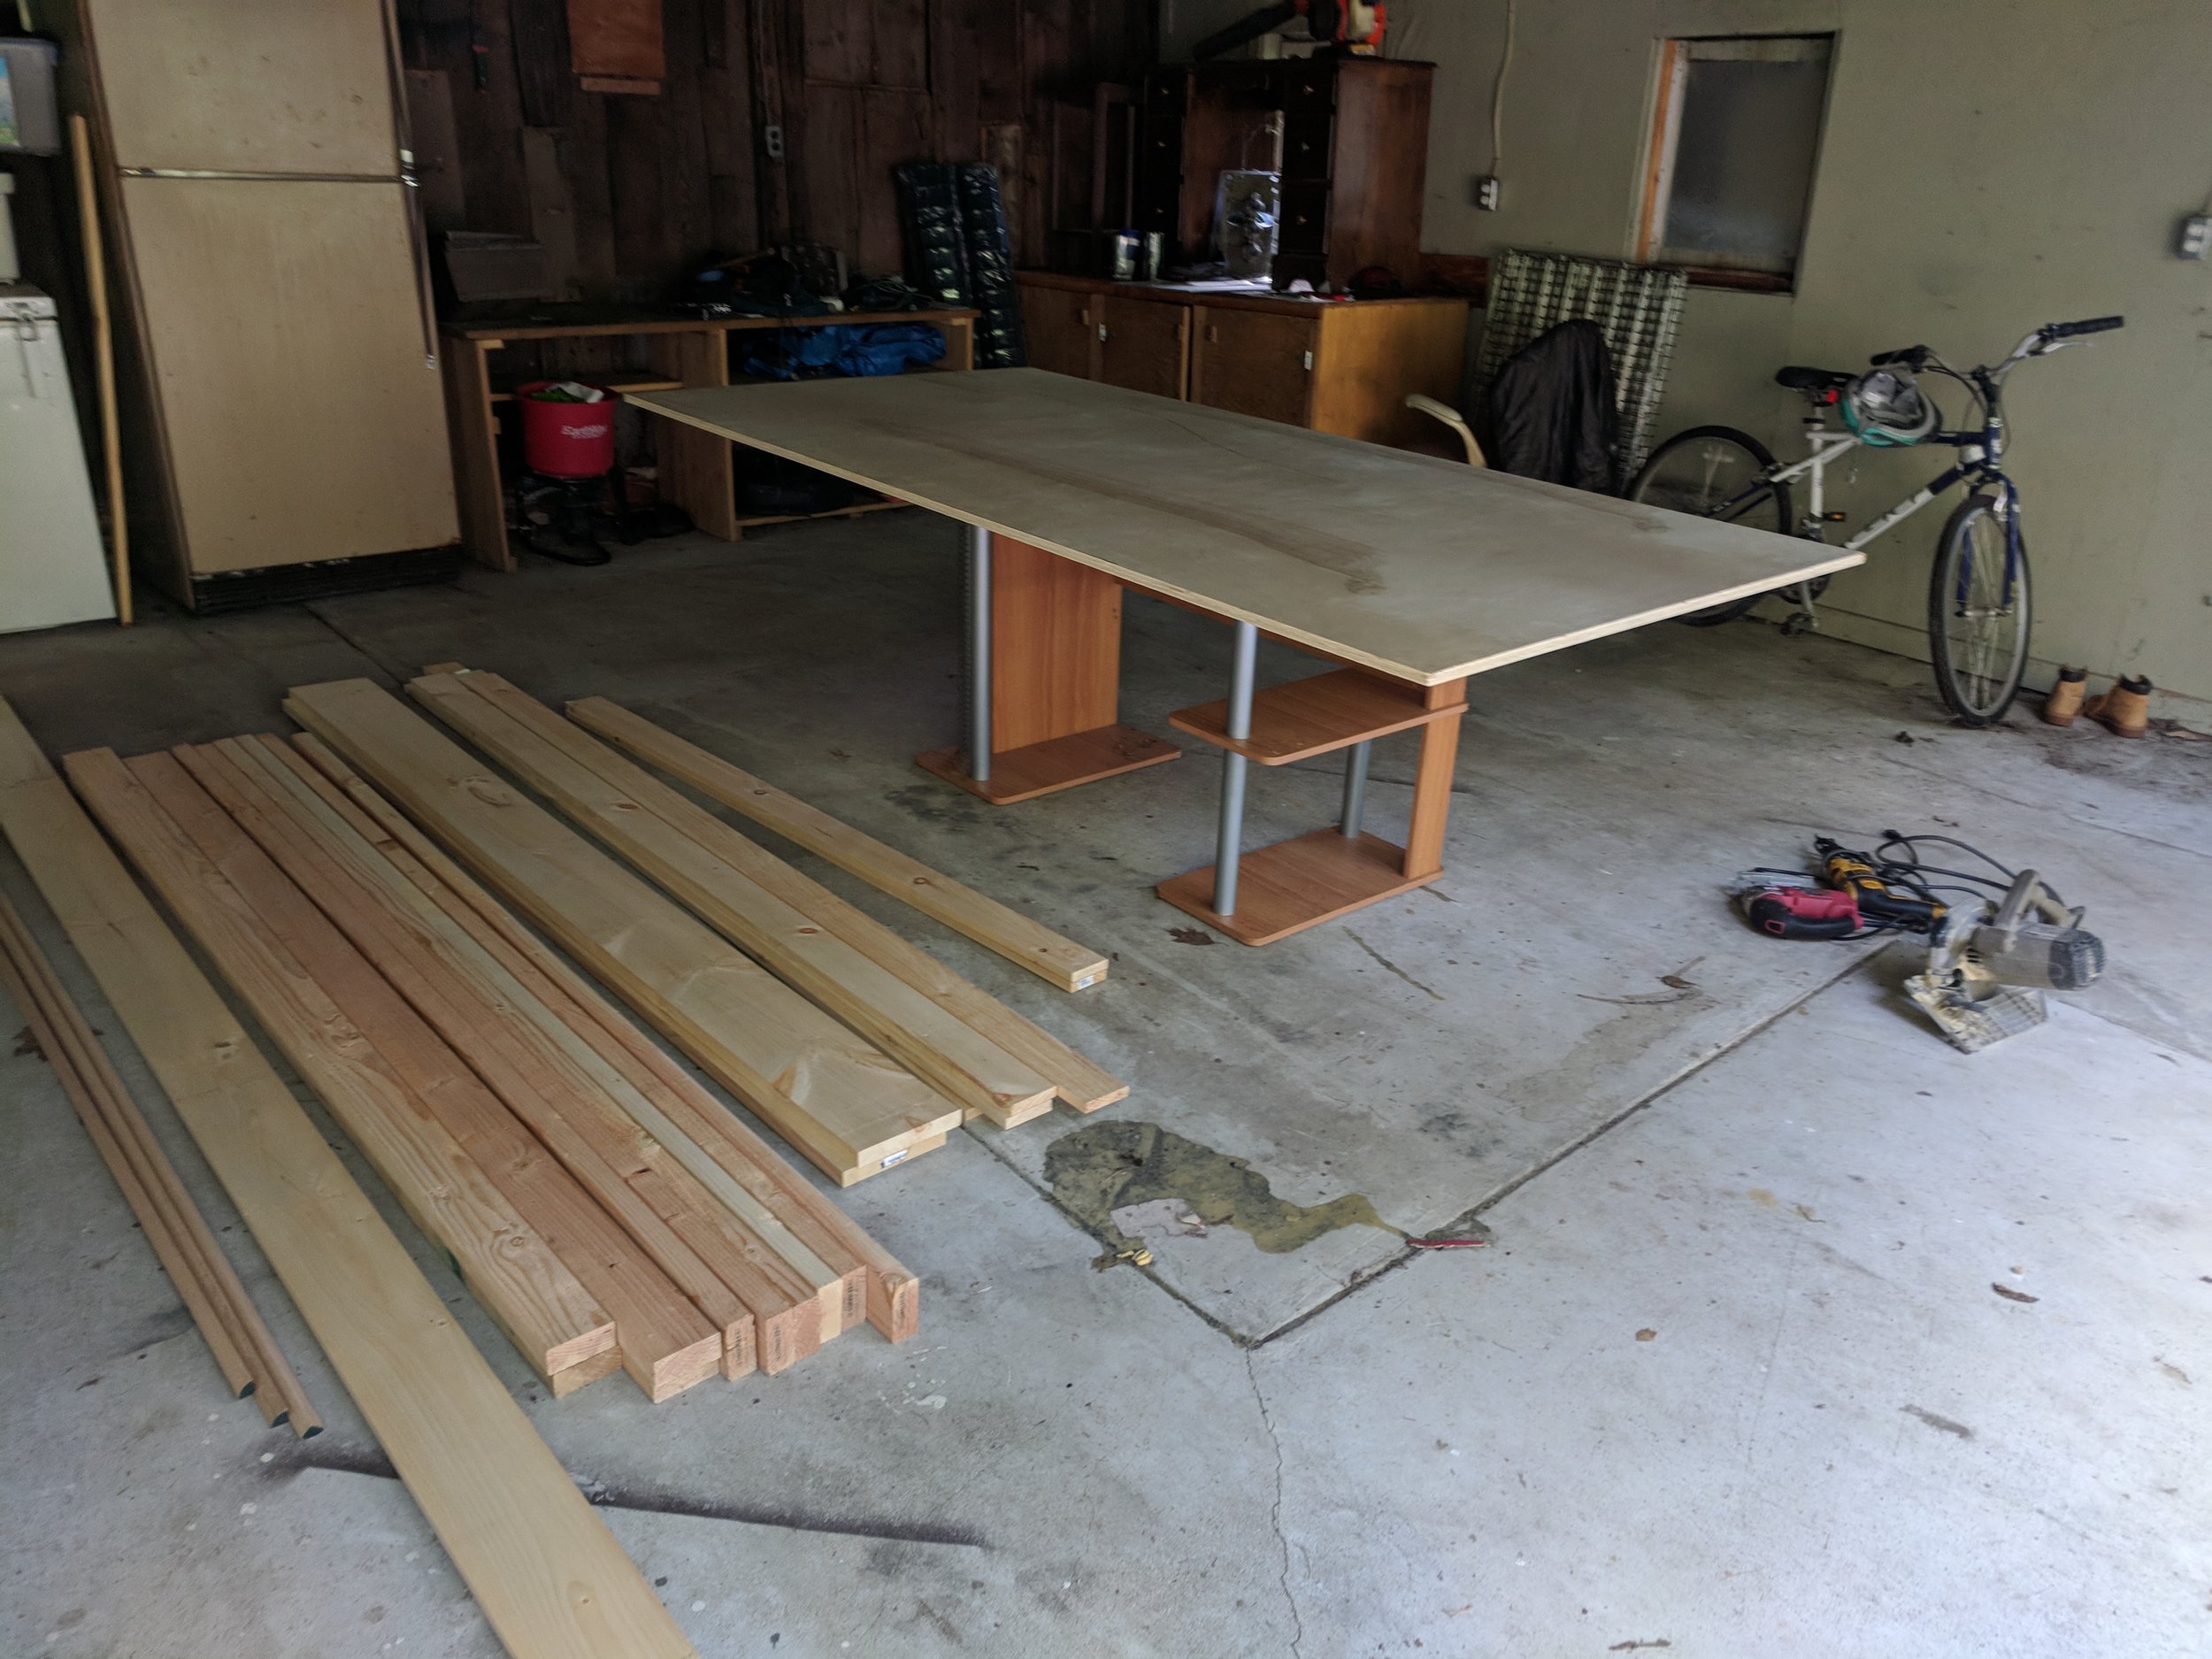
I got all my materials and set everything up in the garage. I had an old desk in there that I used to place the plywood on while building the table, but if you have a couple of sawhorses or some other flat surface to work on, whatever will do.

IMG_20180714_115318.jpg

The first thing I needed to decide was exactly what size the table should be. Based on the size of the room I wanted to put it in, and the number of people I needed to comfortably sit around it, I settled on having the play area be 3'x6' with the total dimensions of the table being closer to 4'X7' with the added length and width of the area around the gaming pit that would have cup holders and dice trays set into it

I cut my plywood down to 3X6 with s circular saw. which is the size it is in the picture above.

The basic plan from this point was to build a framework on the underside to make sure the table was nice and sturdy, and then build up and out off the edges of the plywood on the top to create a raised frame around the center.

Next the framing/support for the bottom using 2x4's. In the original design, there was a cutout and mount for a monitor smack in the center of the plywood there, but I wasn't planning on doing that so I added a third support right in the middle to make sure it was nice and sturdy.

The two sides of this 'ladder' looking thing are the exact same length as the plywood, while the horizontal supports are 24 inches and spaced evenly, using the center one at the exact middle of the table as a reference.

WIth everything centered lengthwise and widthwise, I took a pencil and marked the outlines where the supports were and removed them.

IMG_20180714_154103.jpg

I took my drill and pre-drilled holes where the supports would be attached to the plywood. I always try to pre-drill, as it reduces the risk of splitting the wood, or stripping a screw half way in. Especially since I was going to be using 2 1/2" screws for this part the last thing I wanted to do was spend twenty goddamn minutes unscrewing a stripped screw from the board with a pair of pliers.

IMG_20180714_160122.jpg

2 1/2" screws securely drilled in from below, using my pre-drilled holes as a guide, I flipped the table over to get to work on the top portion.

The next step here would be to put on the first piece of framing, what would essentially create the border around the play area (plywood surface).

IMG_20180716_154516.jpg

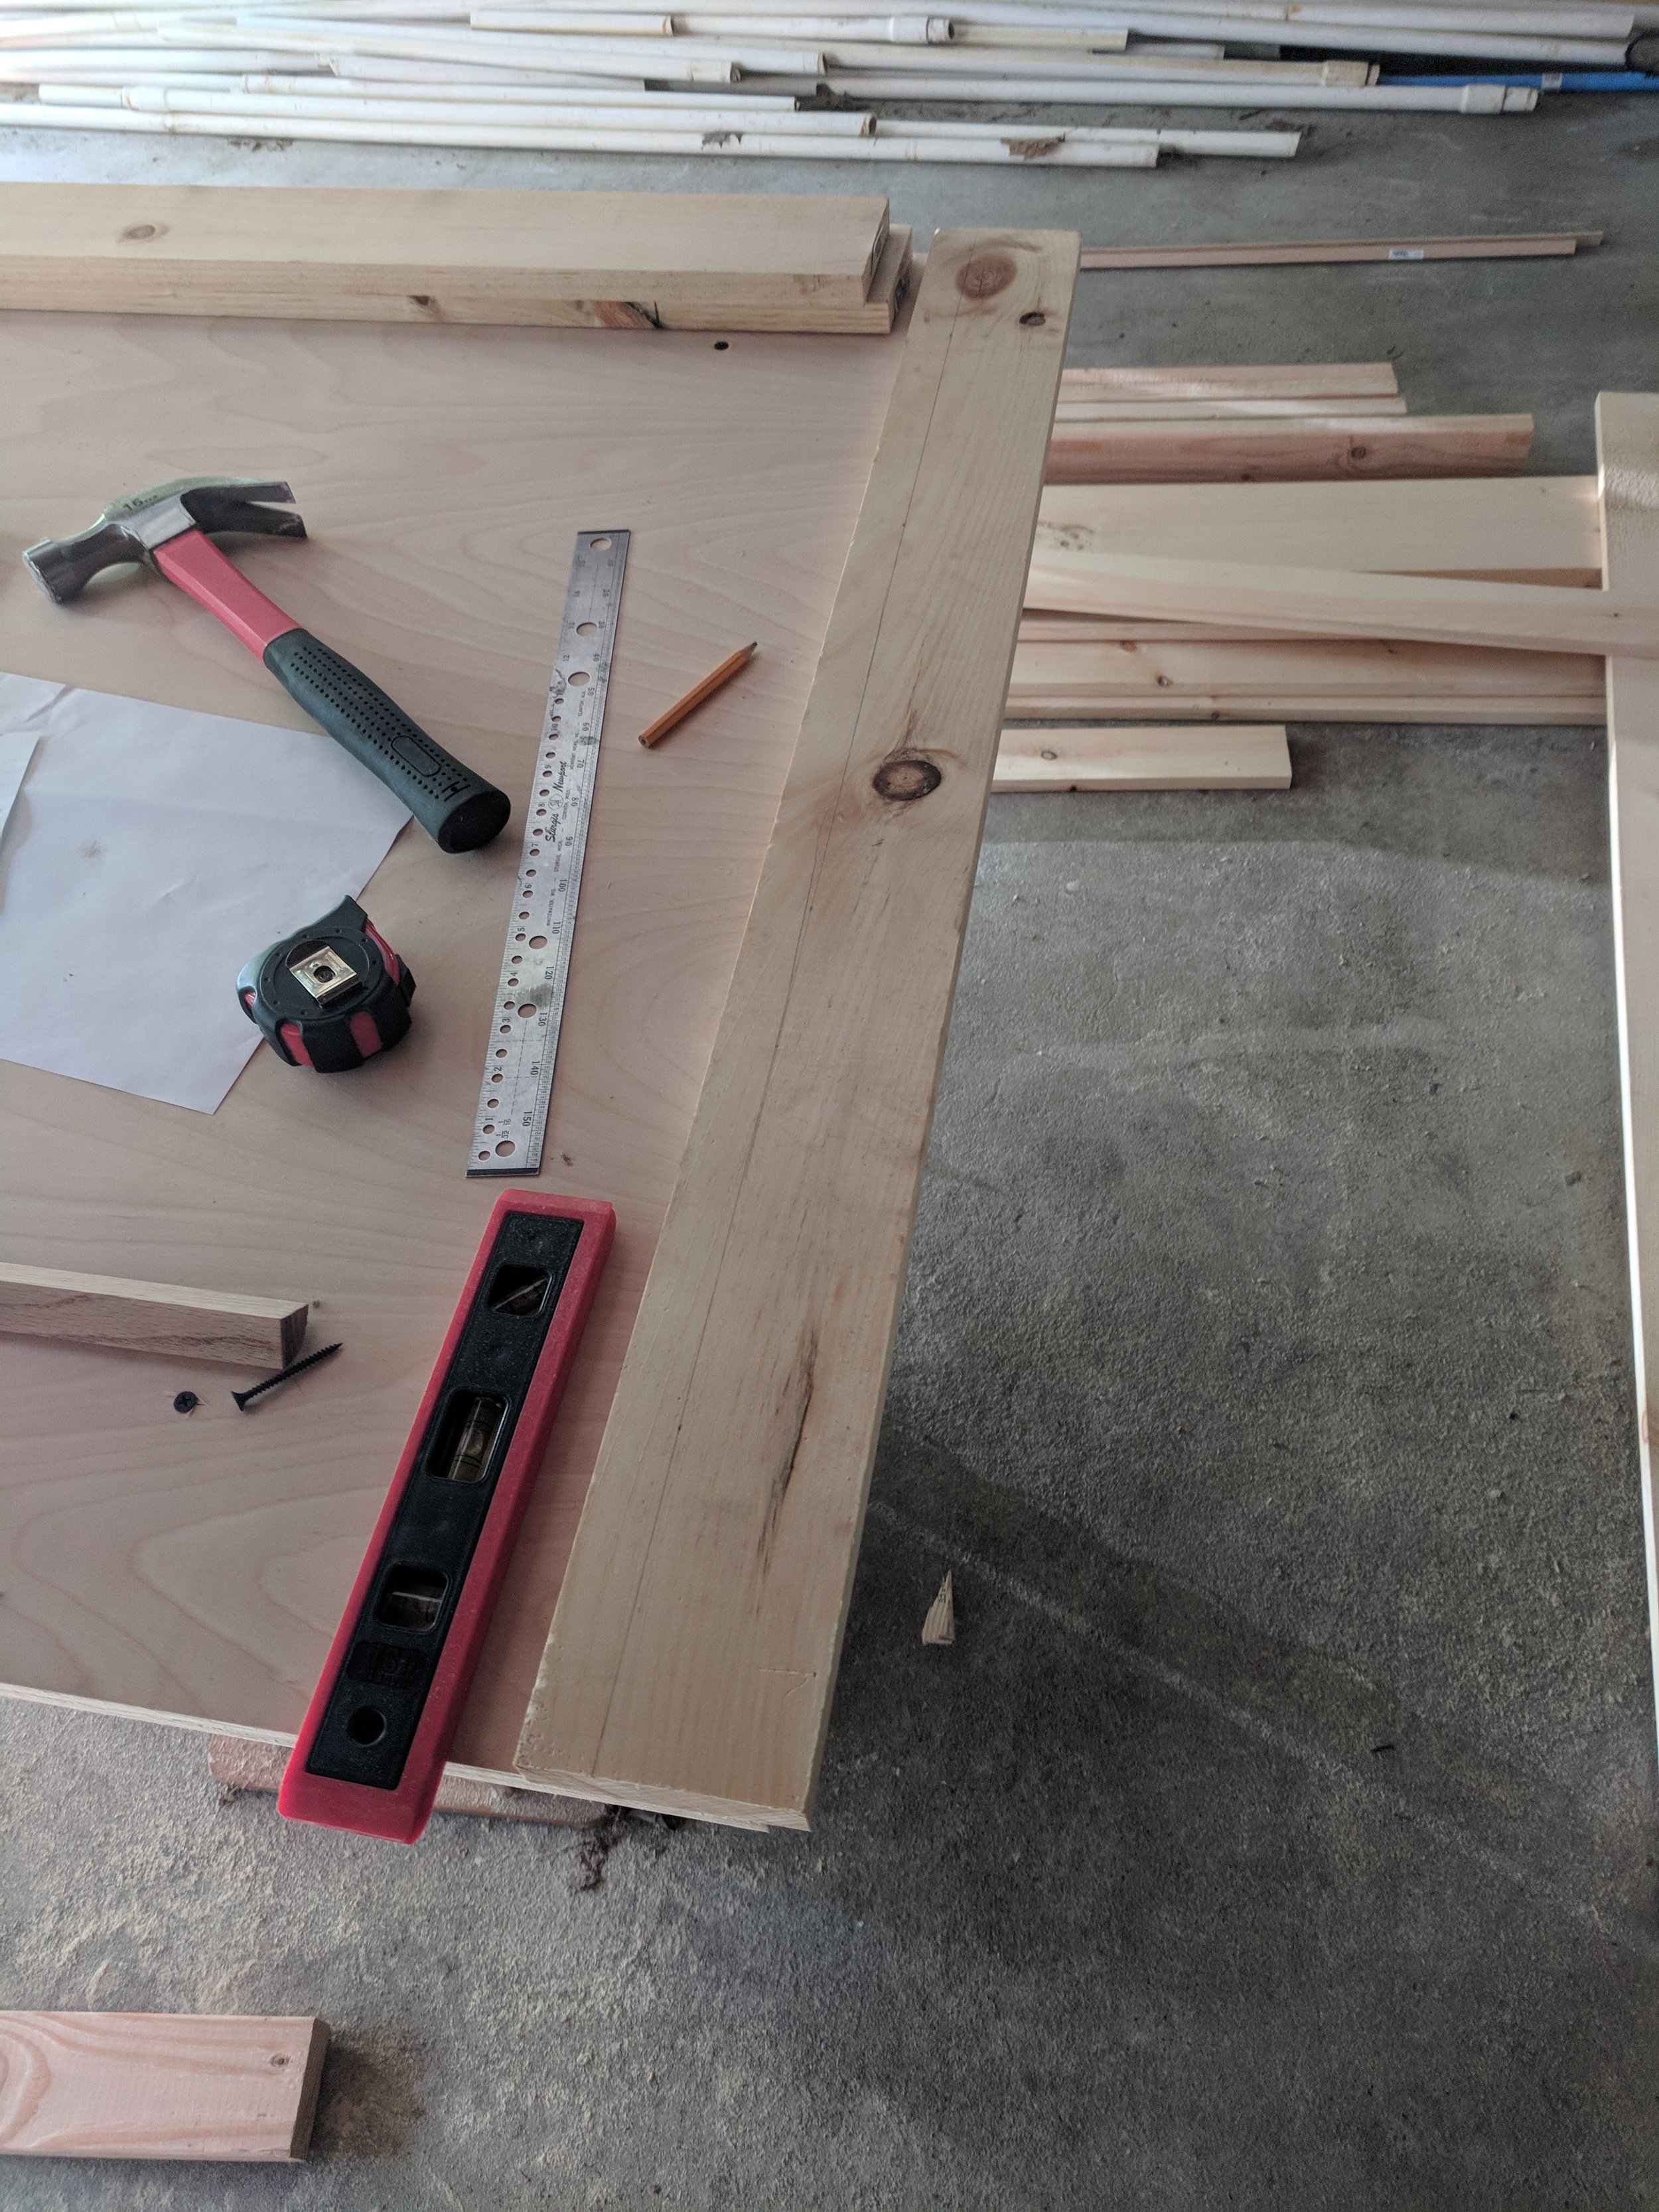
The original plans recommended a 2 1/2 inch lip above the play area so that there would be enough room to place a tabletop over it without having to remove miniatures and stuff, so I marked 2 1/2 inches on the 1X4's that are used for this part. 

This took some figuring as it was poorly marked on the original plans I had, and the walkthrough video didn't cover it, but this framing is done by cutting the two pieces on the long sides of the table so they extend past the end of the table, while the pieces on the short sides sit inside.

You apply a bead of wood glue, line up your 2 1/2" mark with the top edge of the plywood, and secure it with finish nails to hold it in place. You then go back though with 1 5/8" screws and secure it firmly to the plywood.

It looks like this when it's done:

The thing that tripped me up was figuring out exactly how far out the two side pieces needed to stick. What I ended up doing was attaching the two short pieces to the plywood first, since I knew they were exactly the width of the plywood. I then set it on the ground and laid pieces out to mock everything up so I could measure. Essentially, what you are starting here is the framework that the top piece with the cupholders and stuff sits on, the short piece that was just secured being flush with the 1x6 that creates that top.

Long story short if you use the inside corner of the short 1x4 (corner of the plywood) as your starting point, the long board needs to stick out 5" off the end of the table, so that when another 1x4 is later attached flat with the protruding pieces it creates a frame that is 5 1/2 inches wide to fit flush with the 1x6 top piece. (Actual measurement for a 1x6 is really 5 1/2 inches wide, probably for some mathematical reason that makes sense, but I don't understand, so I'm just going with because wood is stupid)

If that was confusing, sorry. It confused the shi%t out of me while I was building the thing, and STILL confused the sh%t out of my trying to re-explain it after I've already done it. Hopefully the pictures going forward will help you understand how it all goes together.

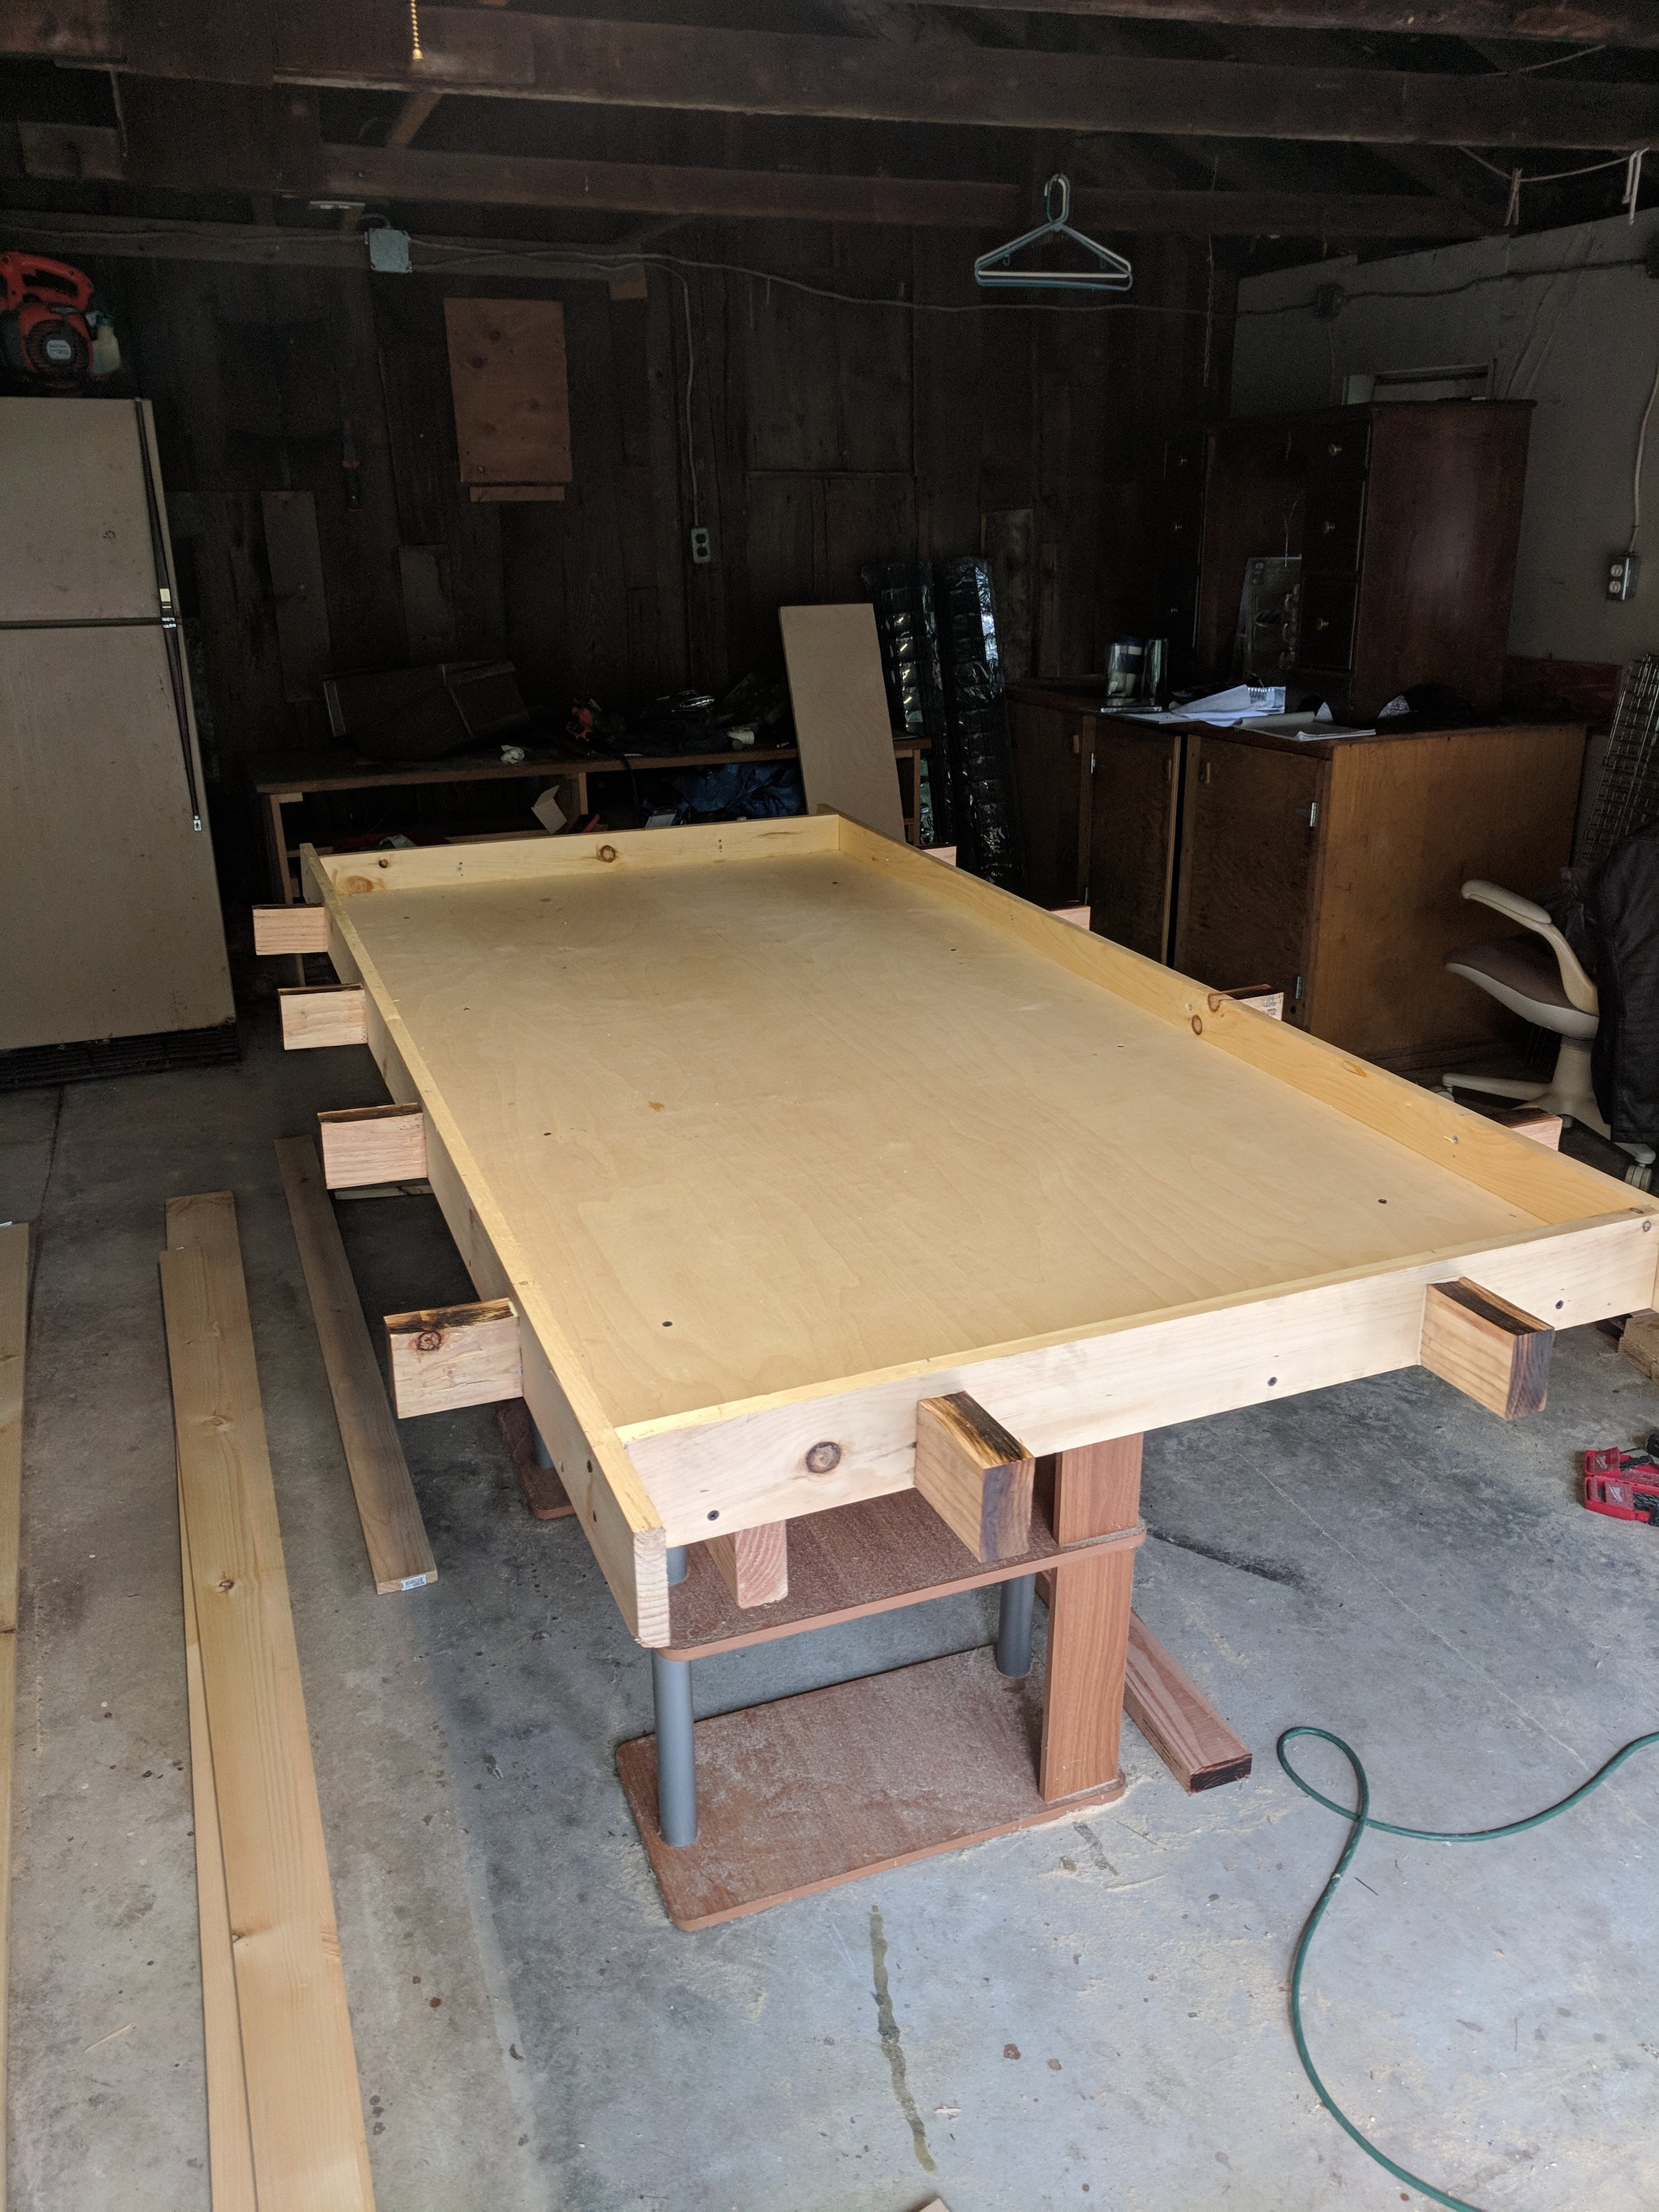
The next thing to do is cut out all these little nubbin boys here. They are made by taking 2X4's, cutting them once to make 5' pieces, and then cutting those lengthwise to shave off about and inch.

These are going to be the braces that go all around the frame we have put up and become supports to make the outer area nice and strong, since that's where people will be leaning. I made 12 of them, and arranged them like this:

IMG_20180716_182212.jpg

The long sides got four each, while the short sides got two. You can kind of see now how those long pieces create two additional supports on the corners. I probably messed this up a little bit with my placement on the long sides with these. I probably should have spaced them out more so that the corners had a support down right at the end just like the short sides do. It all went together fine and seems sturdy, so I guess it's not that big a deal.

To secure these, i put wood glue on the end, pressed it to the 1x4 with the bottoms of both pieces flush with one another then hammered a finish nail in from the inside of the frame to hold it in place and followed it up with a 1 5/8" screw.

This is where stuff started to get a little tricky for me in particular as I didn't have a nice table mounted miter saw for making 45 degree cuts. I was working pretty much exclusively freehand. My hand circular saw did angle to make a 45, but I pretty much had to rely on a steady hand to make it even.

In other words I was f*%#ed at this point.

Using the long pieces of the interior part of the framework as a guide (the shorter edge of the angled cut lined up with the end of the other piece of wood) I made the two of those with the 1x4s and attached them so that I could set my shorter pieces on top and mark where to make my cuts.

I attached these at this point, but you SHOULD NOT. The next step I outline, should be done before you put these pieces in place. It will make your life much easier.

Here it is assembled. The angled pieces get slapped onto the outside of the framework we've created out of our long inner boards and 2x4 nubbies. Two finish nails go into the board at the site of each support with wood glue to seal it all. I also put two nails in each corner to help pull them more flush. Like I said I was freehanding that sh#t, so it didn't come out as perfect as I'd have liked.

IMG_20180718_082906.jpg

Next I put in the quarter round pieces that will serve as a lip for the tabletop to rest on when covering the gaming area.  Like I said, I should have done this before attaching the 1x4 to the outside of the frame because it was a nightmare to attach these. I couldn't get a hammer at a correct angle or with enough force to drive finish nails in, so I ended up having to pre-drill holes with my drill, and then hand screw in 1 5/8' screws doing my best not to punch out of the rounded side if I went too far.

The next step was to cut the 1x6's at 45 degree angles across the width to create the top of our outer border. Again, here a mounted miter saw with a swivel would have been nice, but I did it freehand by making a 45 degree angle line in pencil and following it as steadily as possible.

Here it is with three of the four pieces in place. You can finally tell what the finished thing is going to look like here. with the raised area for players to lean, write and place their drinks on, and the lower portion down below for miniatures and maps.

You can also see here I started tracing my cutouts for cupholders. 

It was around this time that I changed my mind on putting dice trays in, as I felt they would take too much of the surface area away and leave players feeling a little cramped. With such a large interior play area it would be easy enough to roll in there.

I traced the rim of the cupholders so that I'd be able to cut out the hole with a jig saw slightly smaller. The hole didn't need to be particularly pretty, just wide enough that the cup holder could slip in there and rest on the lip.

The cupholders I got off Amazon, they are the same ones the guy used for his original design. A link to them is in the description of the youtube video I'll put at the end.

Here it is all assembled. I attached the tops of the arm rest portion by putting a bead of glue all the way around the 1x4 frame that I created and setting the piece down before securing it with finish nails. I went in after that with wood filler and patched over my nail holes as well as the seams at the corners where my aformentioned lack of proper tools and general shittiness at carpentry had left it looking slopy.

Next I made the legs.

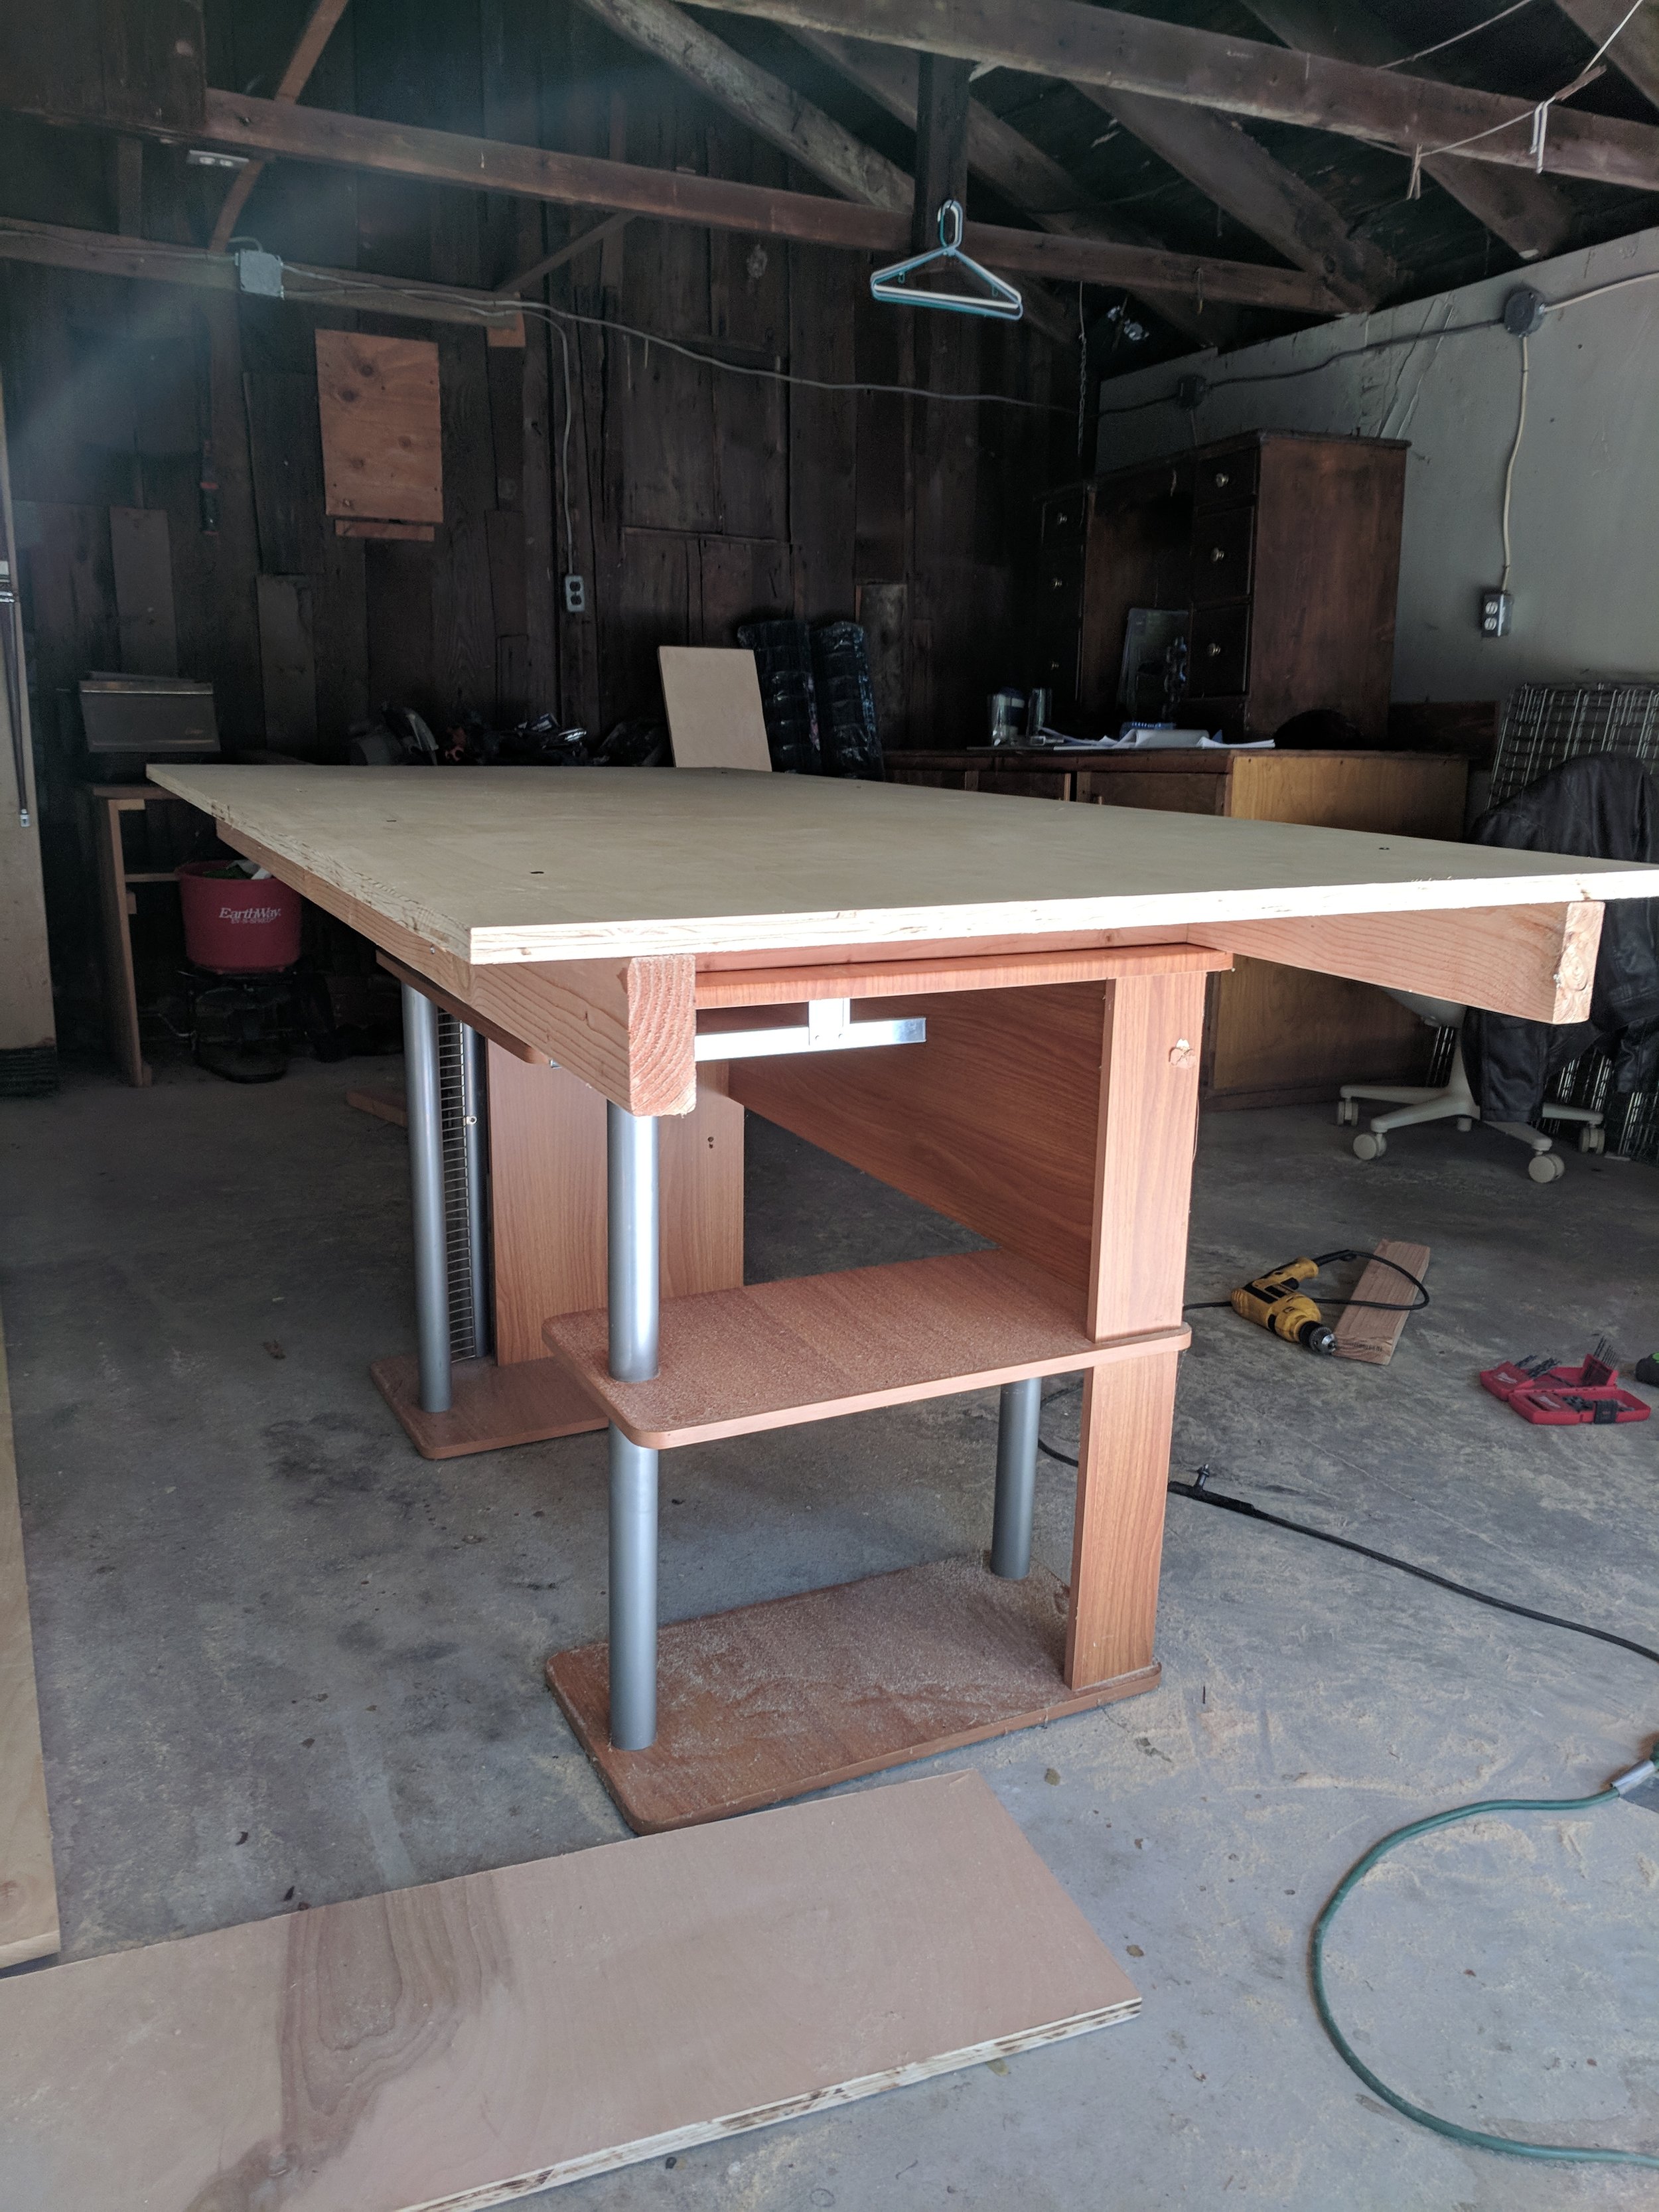
These were pretty simple 2x4 legs. Each one is made by cutting lengths of 2x4s and screwing them together. One piece is longer, and gets cut to whatever the height you want your table to be is. I went a little higher than the original plans, but you could easily go higher still if you wanted a bartop height gaming table. Whatever you cut the longer piece at, you cut the other part of the leg 3 1/2 inches shorter so that it can slot right up against the ladder shaped frame that was done in the beginning.

Rinse and repeat until you've got four identical table legs, then pre-drill and secure the two halves of the legs to each other. I used three 2 1/2" screws for each leg. 

I wouldn't recommend attaching the legs to the table yet, as it will be a lot easier to attach the bottom shelf to them after you make it and then put the thing together in it's final home at the very end.

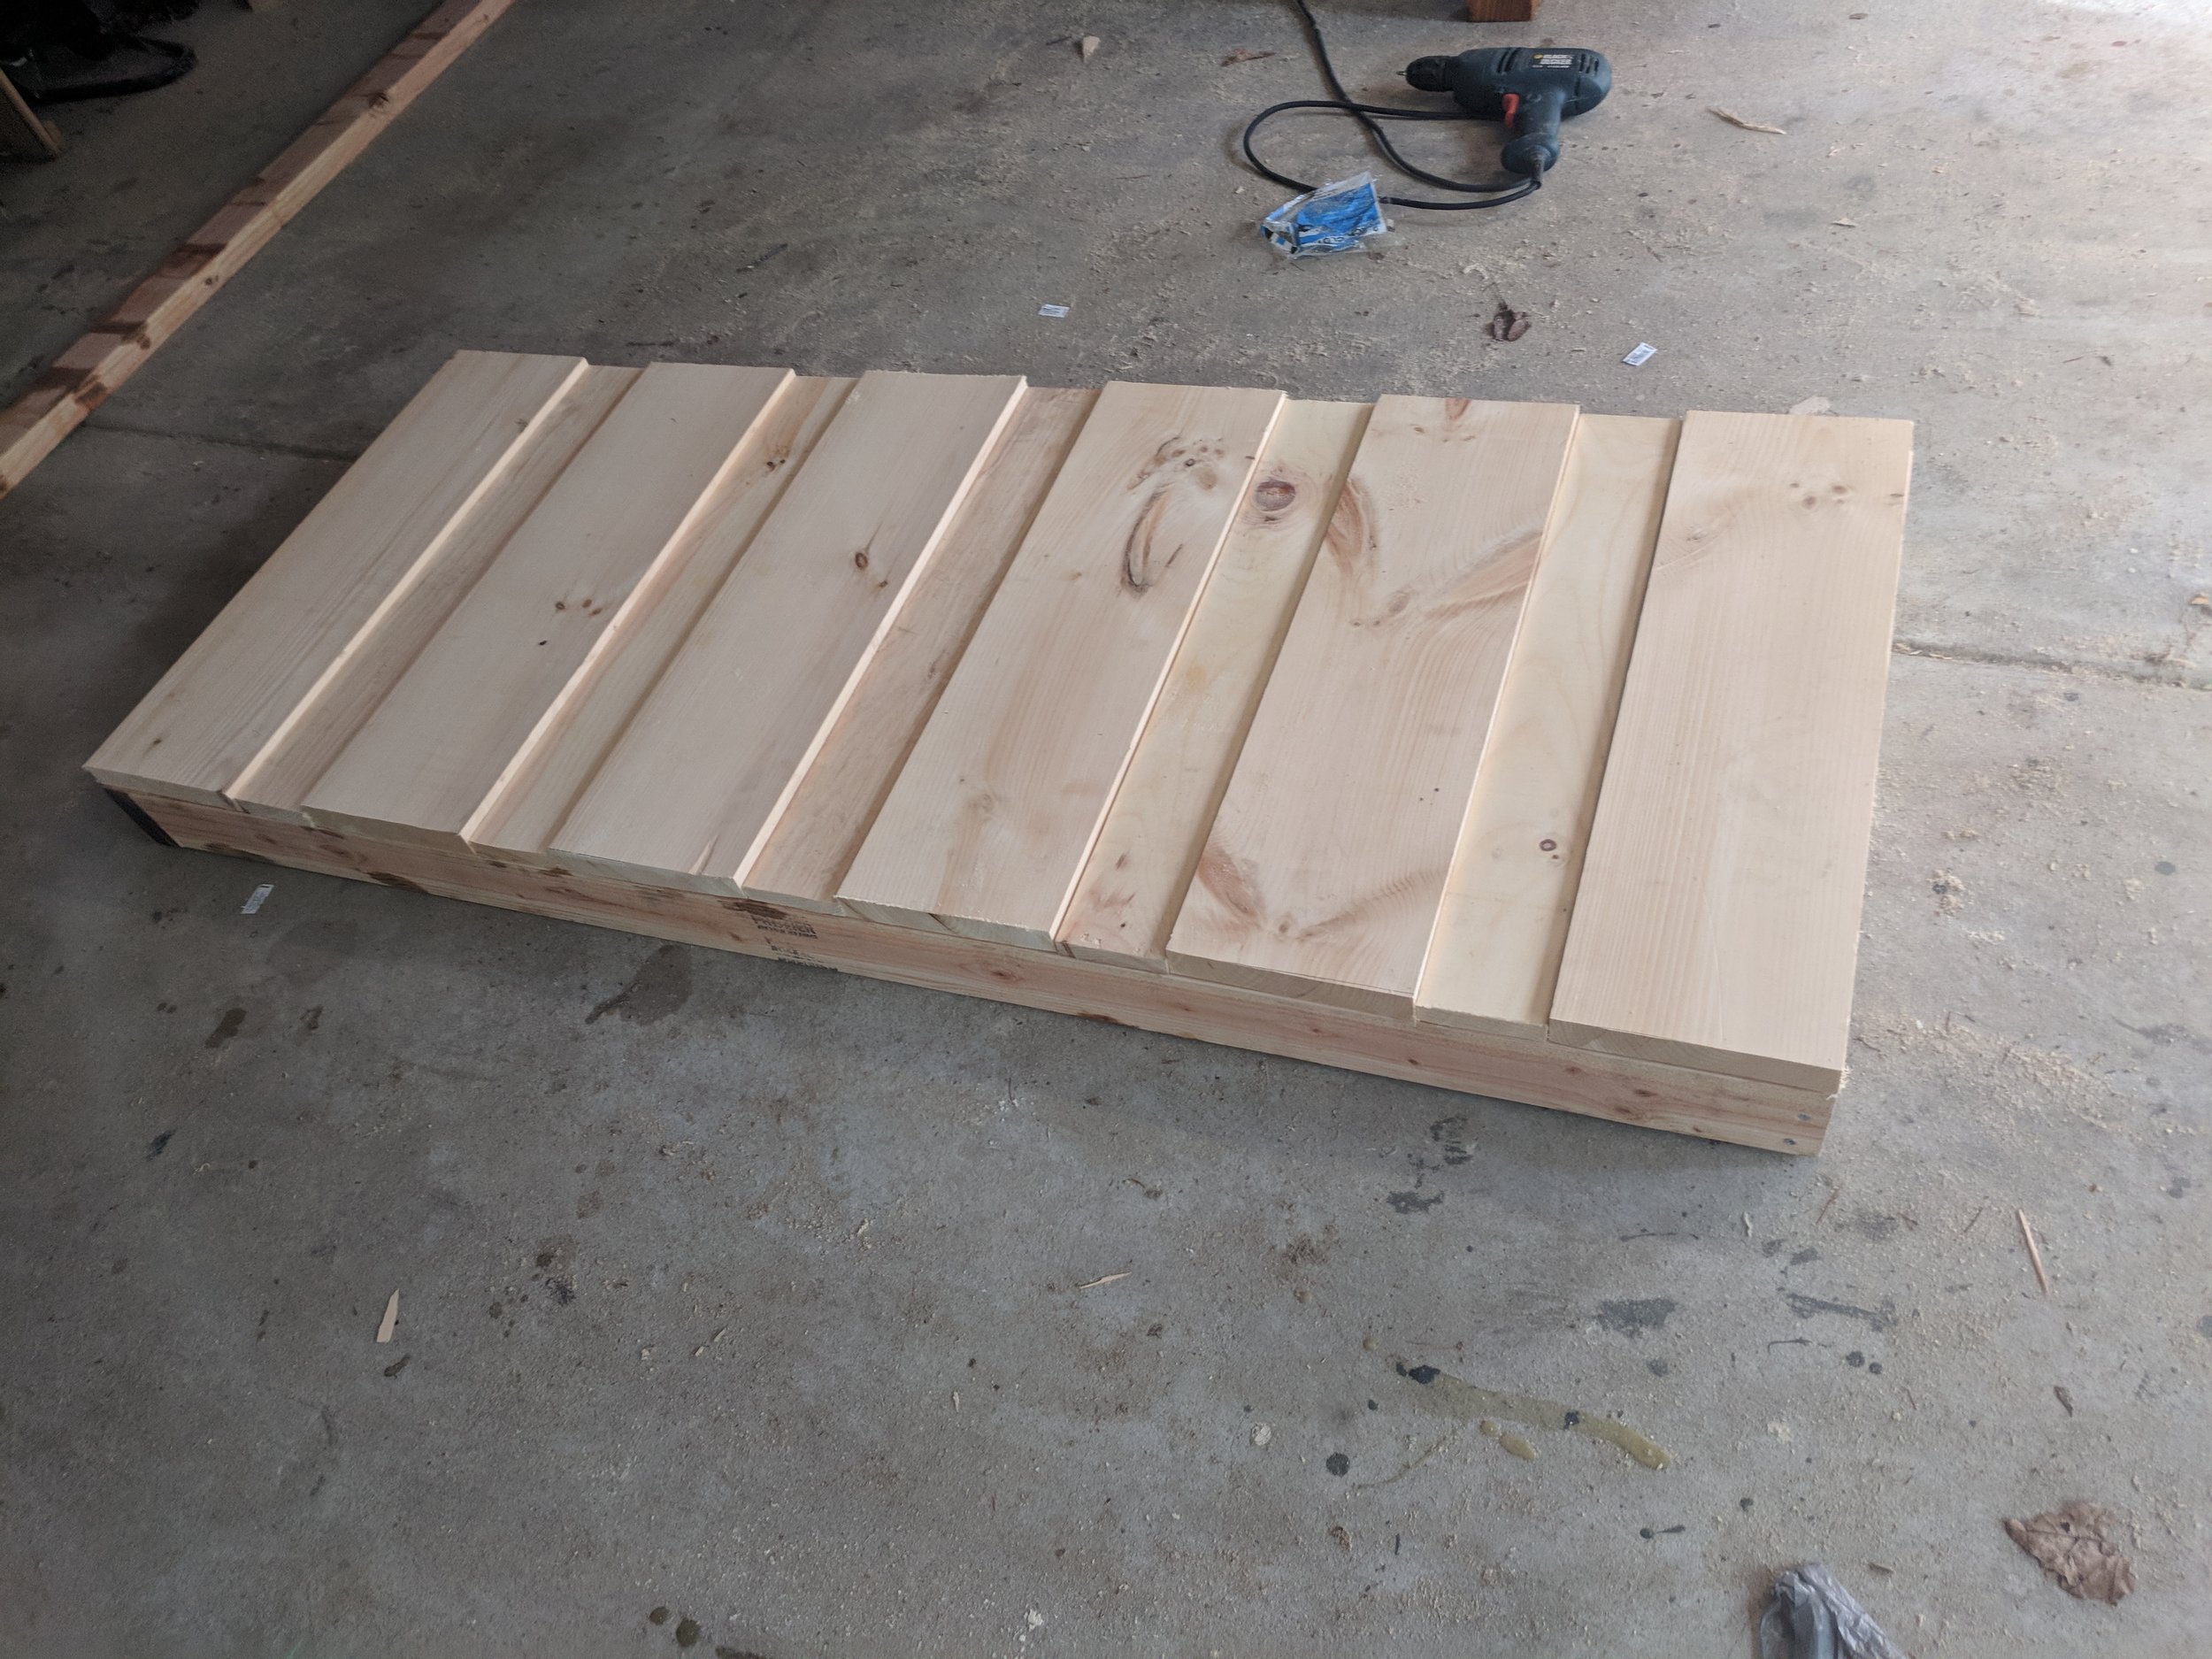
Next I created the slats to sit inside the lip of the table and create a smooth surface for when it wasn't in use for gaming. I had originally intended to make them horizontal but a friend suggested they would look better as long vertical planks instead. Due to the fact that he was right and also doing long vertical planks meant less cutting I decided to go with that. Whoever said laziness and aesthetic appeal didn't go hand in hand?

To get the 1x8's to fit properly I did still have some cutting to do though, so first I cut them all down to 6ft so they would fit lengthwise. The math wizards in the group might be saying "Hey, isn't that opening 36 inches wide? 8inch planks aren't going to divide evenly into that amount of space".

The math wizards are correct. Five 8' planks, which we all know are really 7.5 inches across because wood is stupid, to fit into the 36inch opening I left four of them alone and cut the fifth piece down to six inches wide using a table saw and set this in as the middle piece.

It's hard to see here, but I cut a hole in the center of that thinner piece so that it could hooked with a finger and lifted out of the center when you were trying to take the cover off.

At this point I wanted a change of pace from measuring, cutting and building, so I decided to leave the bottom shelf for later, and go on to sand stain and finish the parts I had already built.

IMG_20180720_164114.jpg

I used the 120 grit sandpaper to smooth down any rough patches and then switch to the 220 to give everything a once over to get it as smooth as possible, I have an orbital sander, but after doing all of the cutting freehand I had some stupid idea that Id forsake the power tool and sand it all by hand. I do not recommend this it was tiring and took forever.

I used a lighter colored stain, with just a hint of amber tint to it, because I was going for a rustic, well worn tavern table look to go with the D&D concept of the table. It took two coats of stain to get the color the way I liked it.

For the finish I used the Spar-urethane because I did some research, and short of actually building a framework around the table pieces and doing a resin pour, that was the best finish to give that thick glassy bartop look I wanted. 

The urethane took three coats to get it nice and solid. I had some trouble with the slats after the urethane went down as the layer added just enough extra size and friction to make them not want to fit. I had to further shave down the center plank little by little until it fit in.

Once it was all dry I popped the cupholders in to see what the finished tabletop would look like. I opted not to secure the cupholders, as they fit in there fairly snugly, and I figured if anyone ever spilled or anything they'd be easier to clean if I could just take them out.

IMG_20180723_162015.jpg

The bottom shelf was surprisingly easy to make. It's just a frame of 2x4s screwed into each other with 2 1/2 inch screws  then planks get attached to the top with wood glue and finish nails.

I measured the distance between the insides of the long supports on the underside of the table and made the shelf that exact width and 62 inches long. For the top I used pieces of leftover something I had picked up at some point that was not the size I thought it was (I think they were 8 inches wide by 1 1/2 or something) It turned out I had just enough to perfectly fit the frame I'd made, and the pattern of the alternating depth wood looked cool so I wen't with it. It was either that or go buy more wood, and once again, laziness and aesthetics are not mutually exclusive.

I sanded, stained and finished it the same as I had done with the tabletop and legs, attached the legs to the corners of it from the inside with 2 1/2 inch nails and it was all done.

I attached bottle openers to the four corners of the table top so people could open their beers while we play, and it was all ready to go except for getting it moved inside, assembled, and finishing the play surface on the interior.

I did bring it inside at this point and attached the top to the bottom. For the play surface I decided to use cork. I thought felt would look bad if I tried to put it down myself, and that 5mm craft foam that you see used a lot didn't seem like it would hold up, so I found a roll of 4ft by 6ft cork sheeting that I could cut to size and super glue to the play surface.

IMG_20180728_125431.jpg

If you were following along, doing your own table build, you could call it a day at this point if you wanted to. The table has everything it needs to be a completely low tech solution for your tabletop game. As I said, I'm not really a computer maps and mounted monitor kind of DM so for the most part a nice looking table with some minor bells and whistles pretty well covers my needs.

IMG_20180728_125905.jpg
IMG_20180728_151154.jpg

I did however get a little ambitious with some ideas for some slight upgrades to add a little bit of tech flare to my setup. If none of this other stuff appeals to you, feel free to stop at the above point, but here is a breakdown of a couple of add-ons I made:


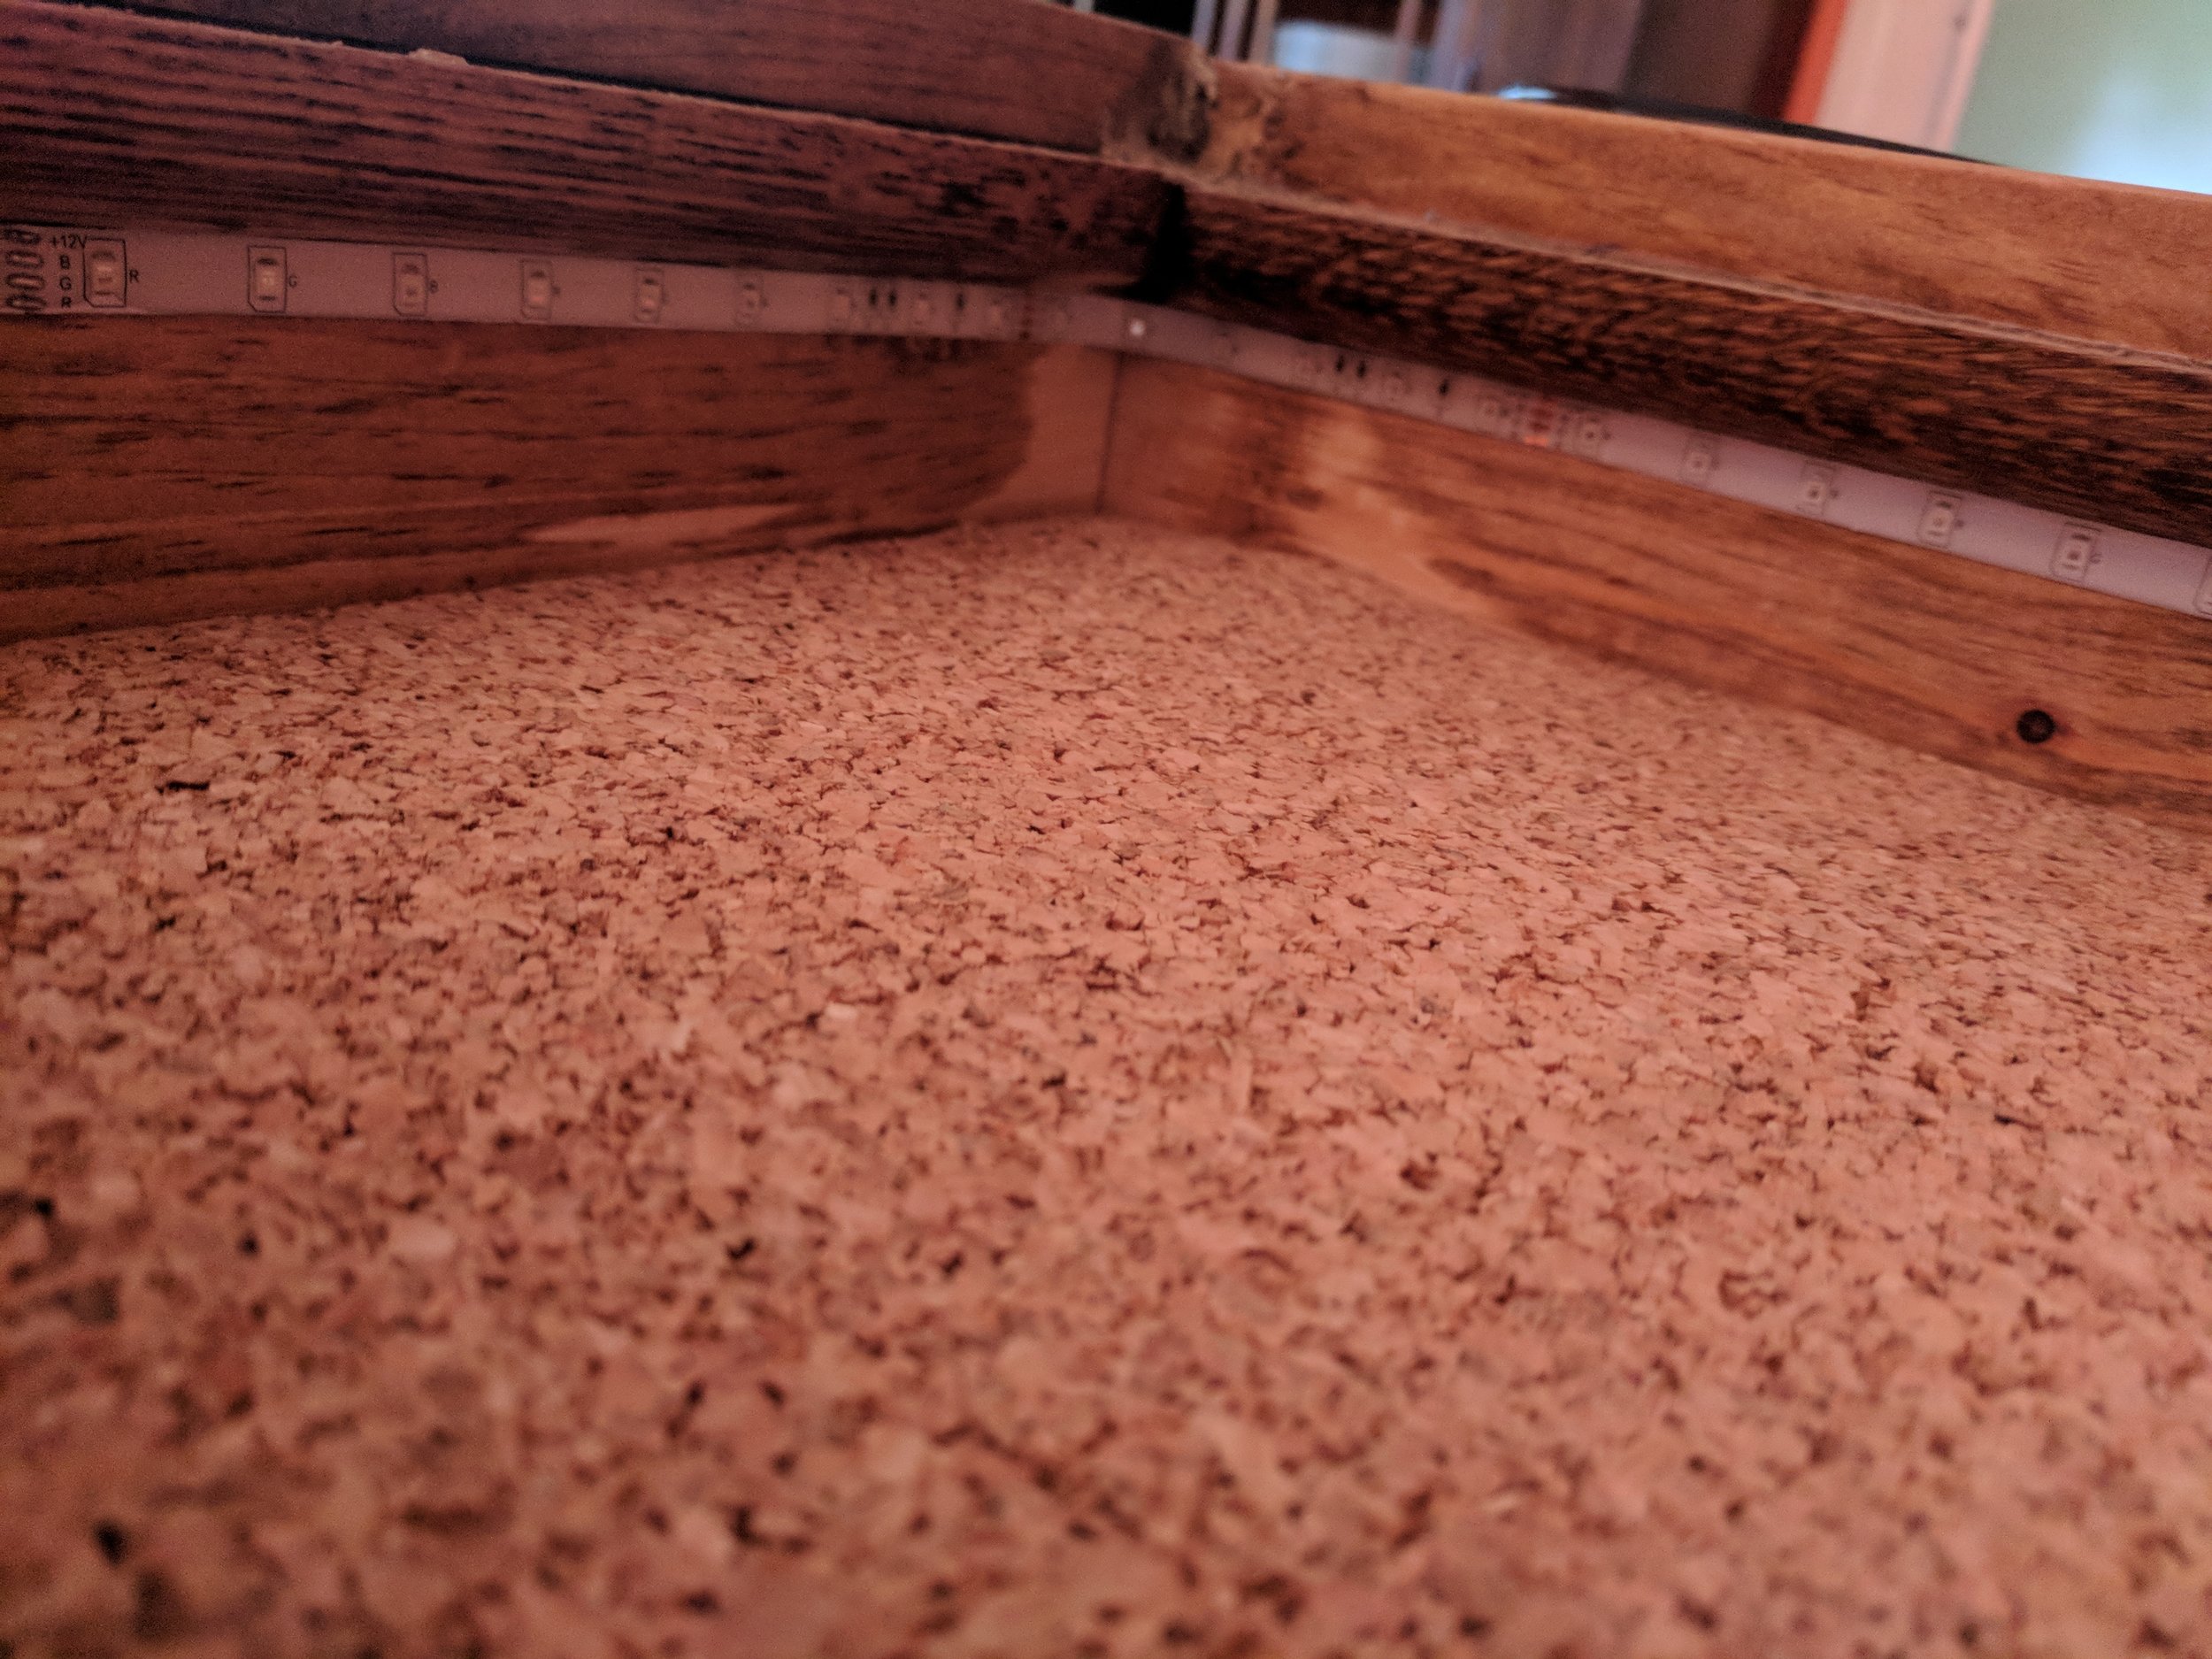
The first thing I added was these color changing LED strip lights that I found around the interior border. The lights I found have a little remote control so I can switch them to different hues so I can play around with mood lighting. Red when the party fights the dragon in it's lair full of magma flows? Green when they walk through the sunlit forests of the elves? Pink when the bard starts playing Barry White in the tavern to seduce wenches? You get the idea, I told you I run an immersive game and anyone who says otherwise is a lying son of a b#tch.

IMG_20180812_140107.jpg

I secured them around the interior lip of the play area and drilled a small hole through which to run the power cable out of the table and down the leg. 

IMG_20180812_140127.jpg
IMG_20180812_180046.jpg
IMG_20180812_180050.jpg

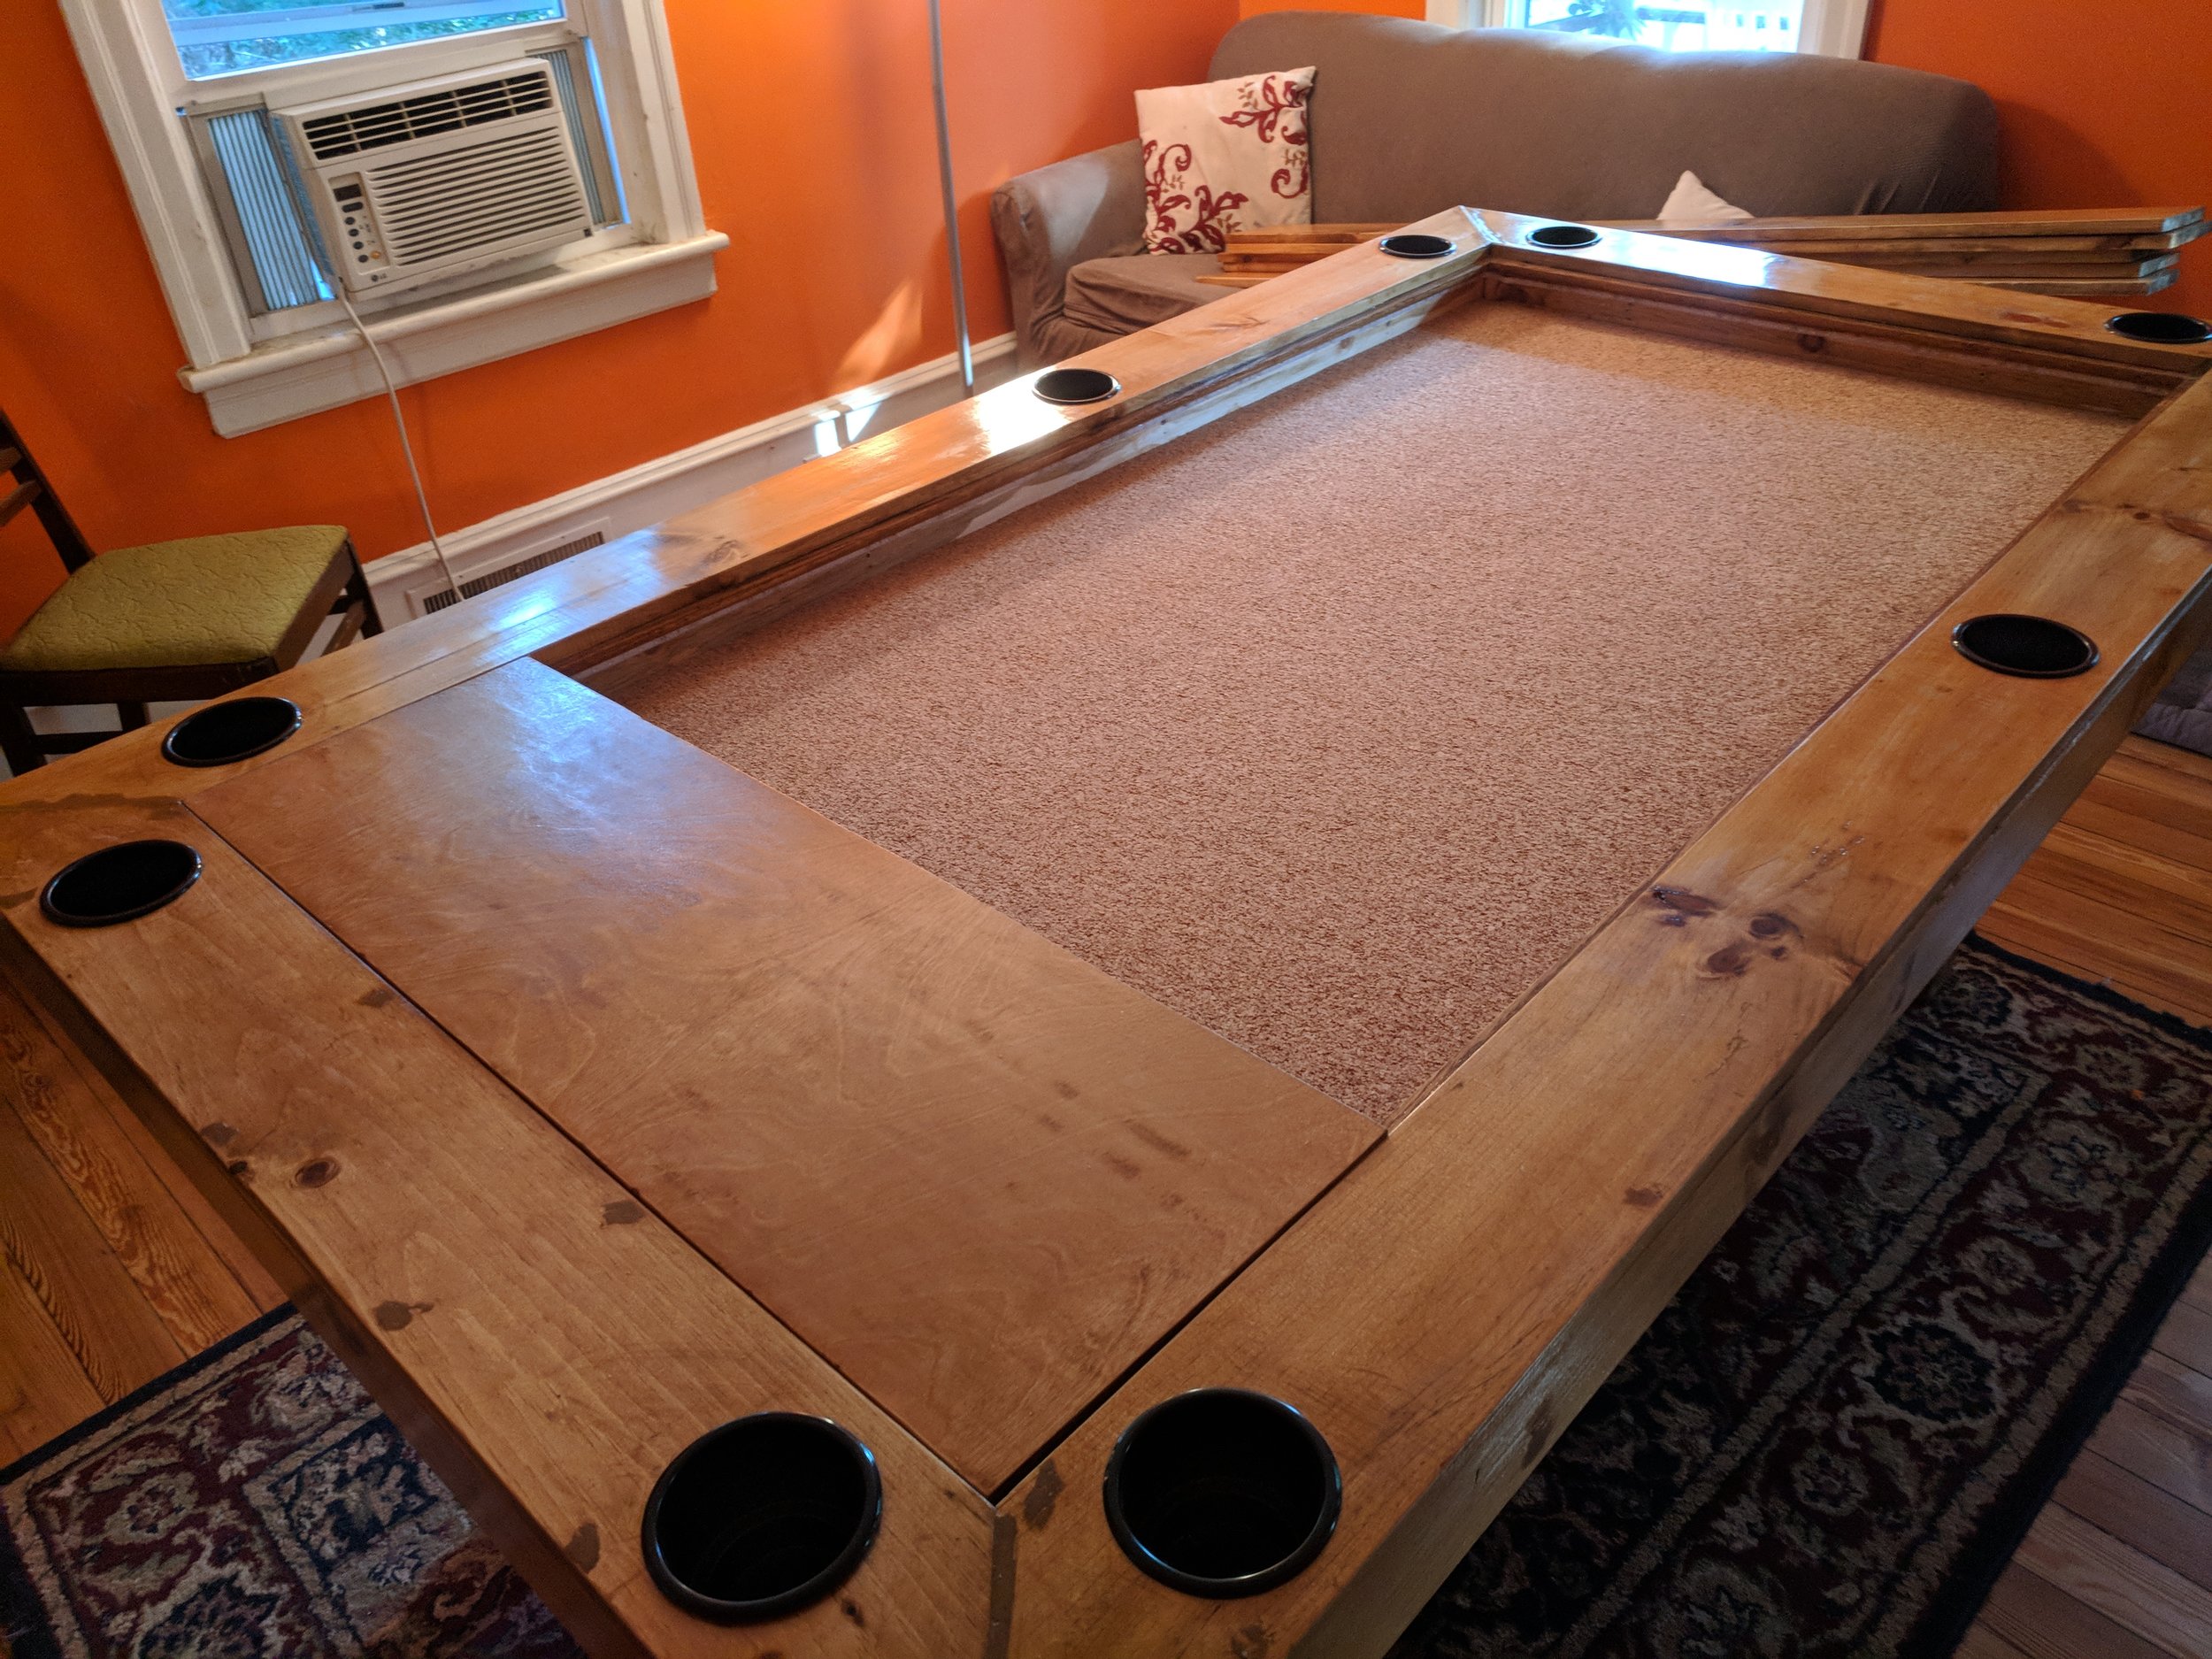
Last, I decided I wanted to create a piece that would give me (or anyone DMing) extra space at the head of the table for all the assorted stuff they need, so I took a scrap piece of the plywood I'd cut off the table and made a single horizontal plank about a foot wide that I stained and finished. Plywood doesn't really take stain properly the way a normal piece of lumber will so I don't typically recommend it. For me it was the only spare piece of wood I had that was large enough and it was a combination of wanting to make use of what I had if I could and not caring all that much about the appearance since it was only there to get hidden behind the DM screen anyway. Sometimes laziness and aesthetic appeal are in fact, at odds. 

If you wanted to do this, it would be a simple matter of getting another board at whatever width you felt was suitable for the DM area.

IMG_20180812_174558.jpg

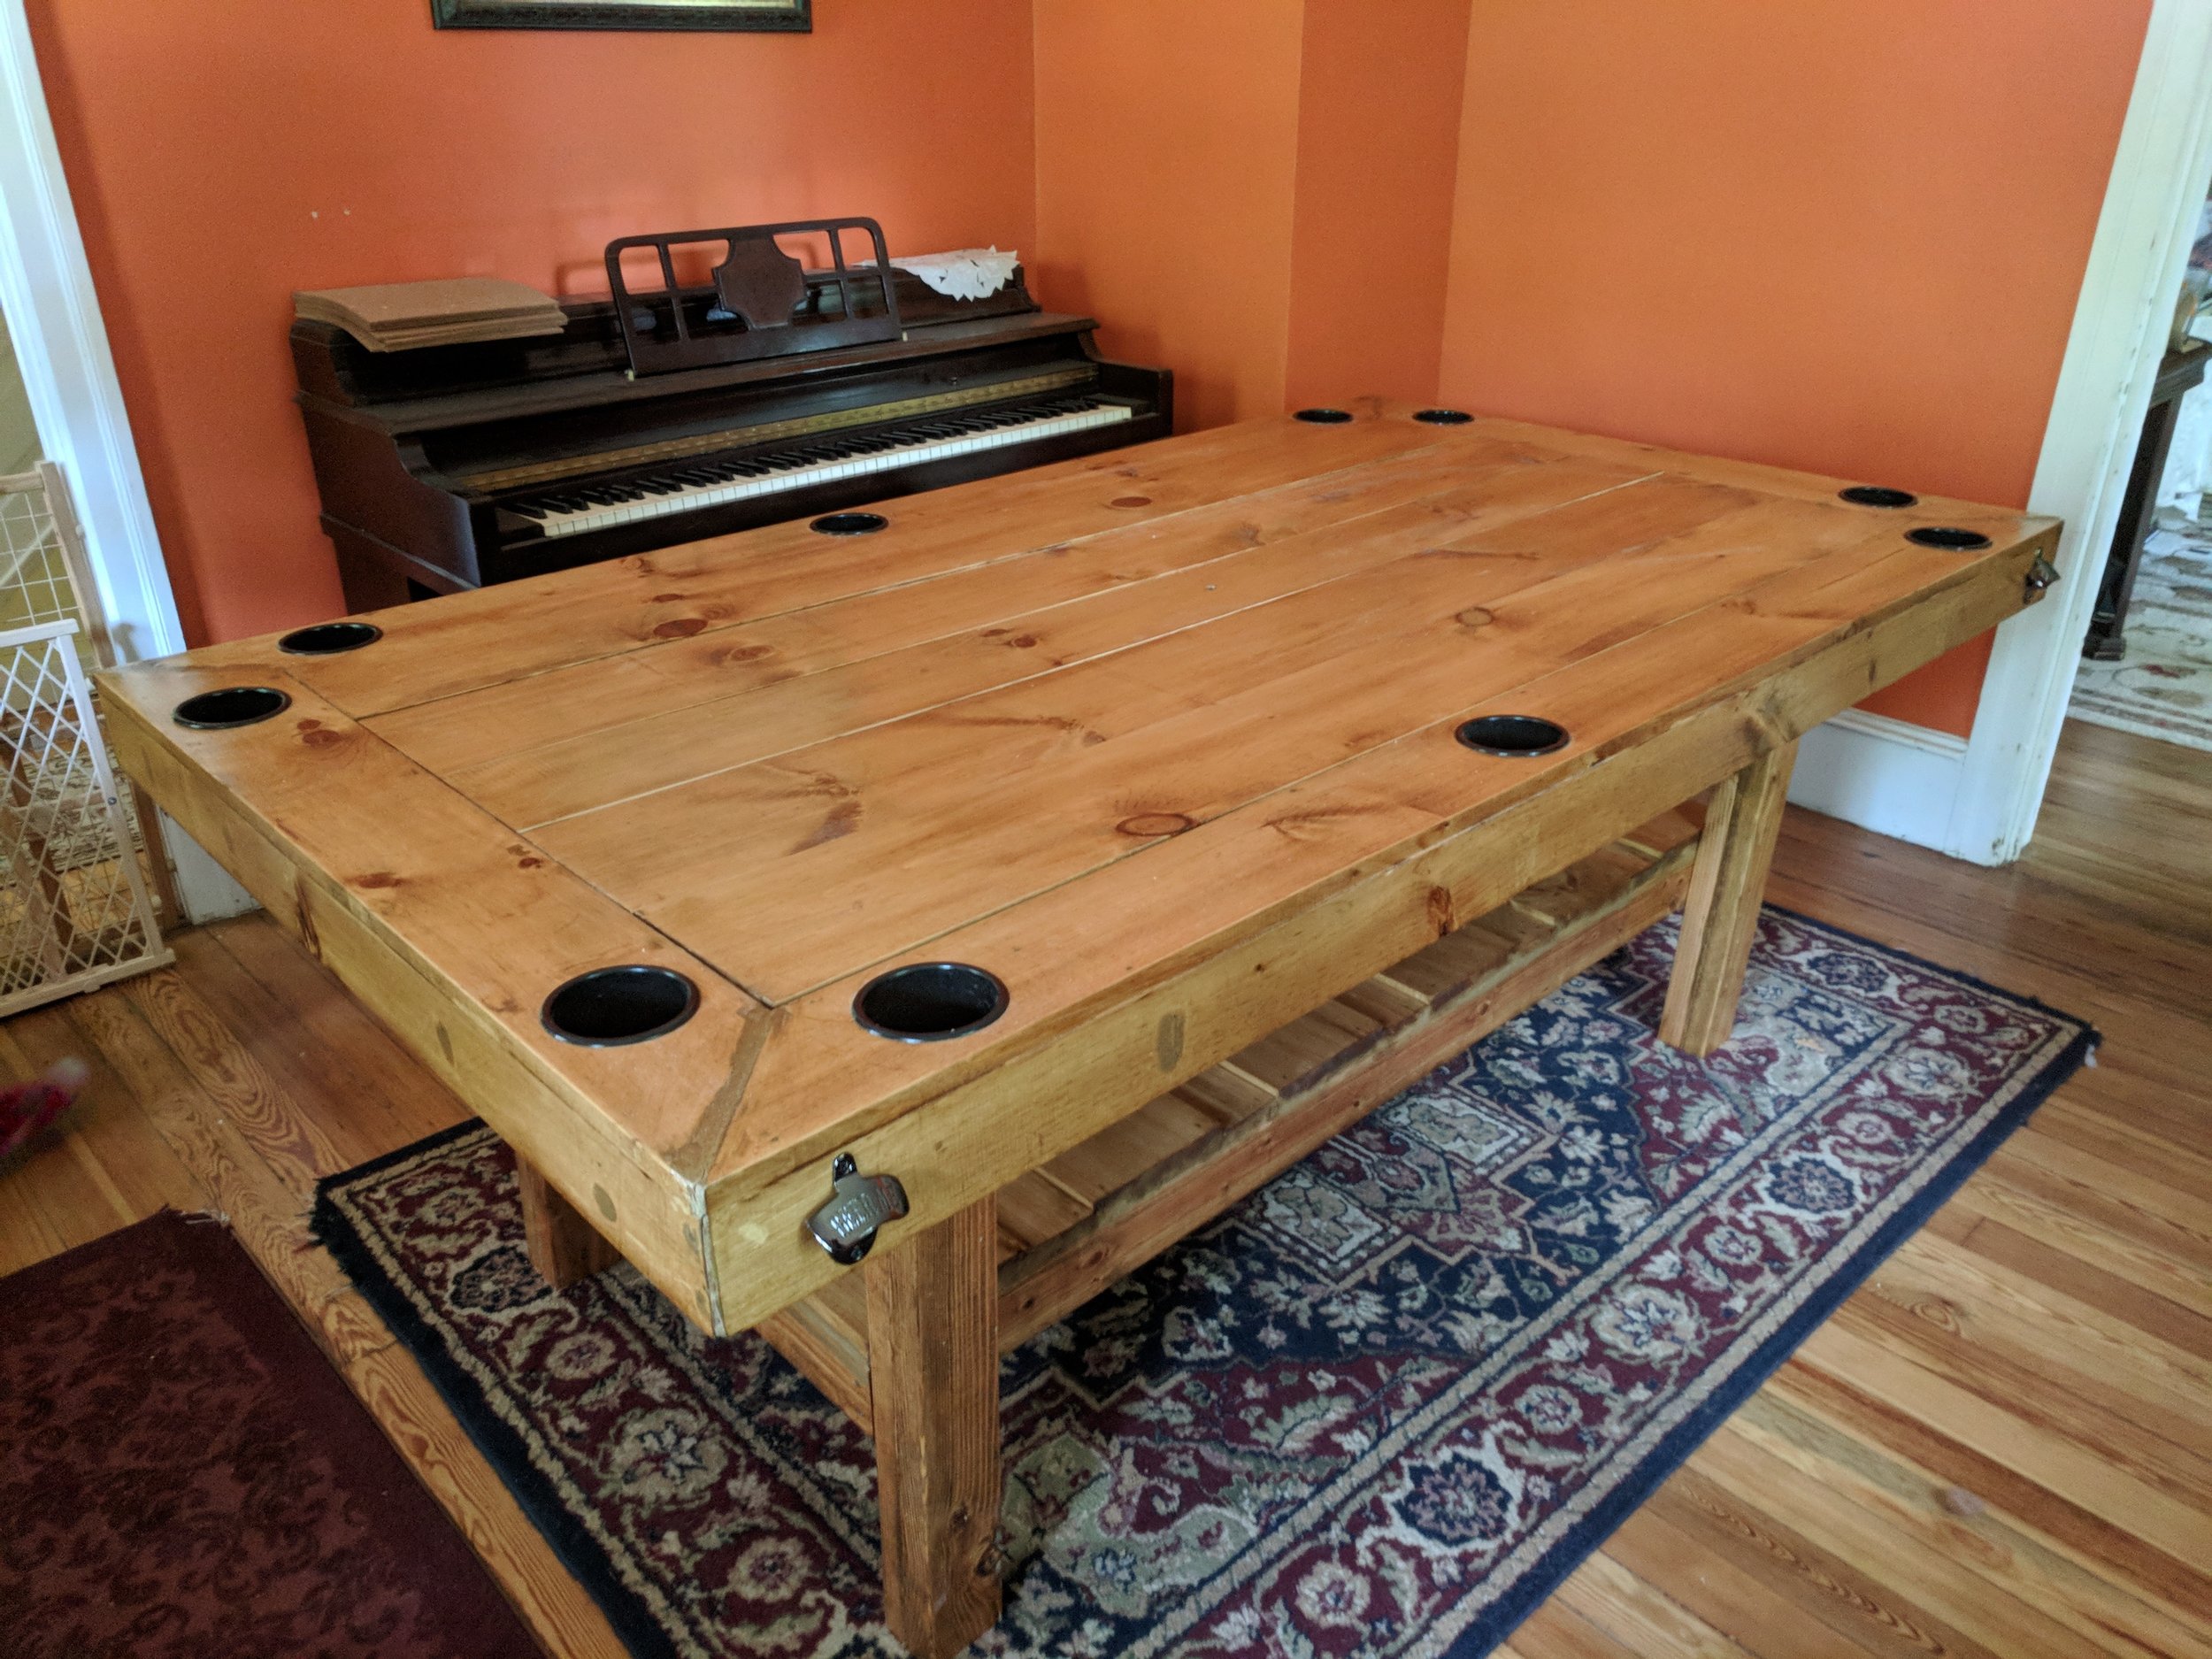
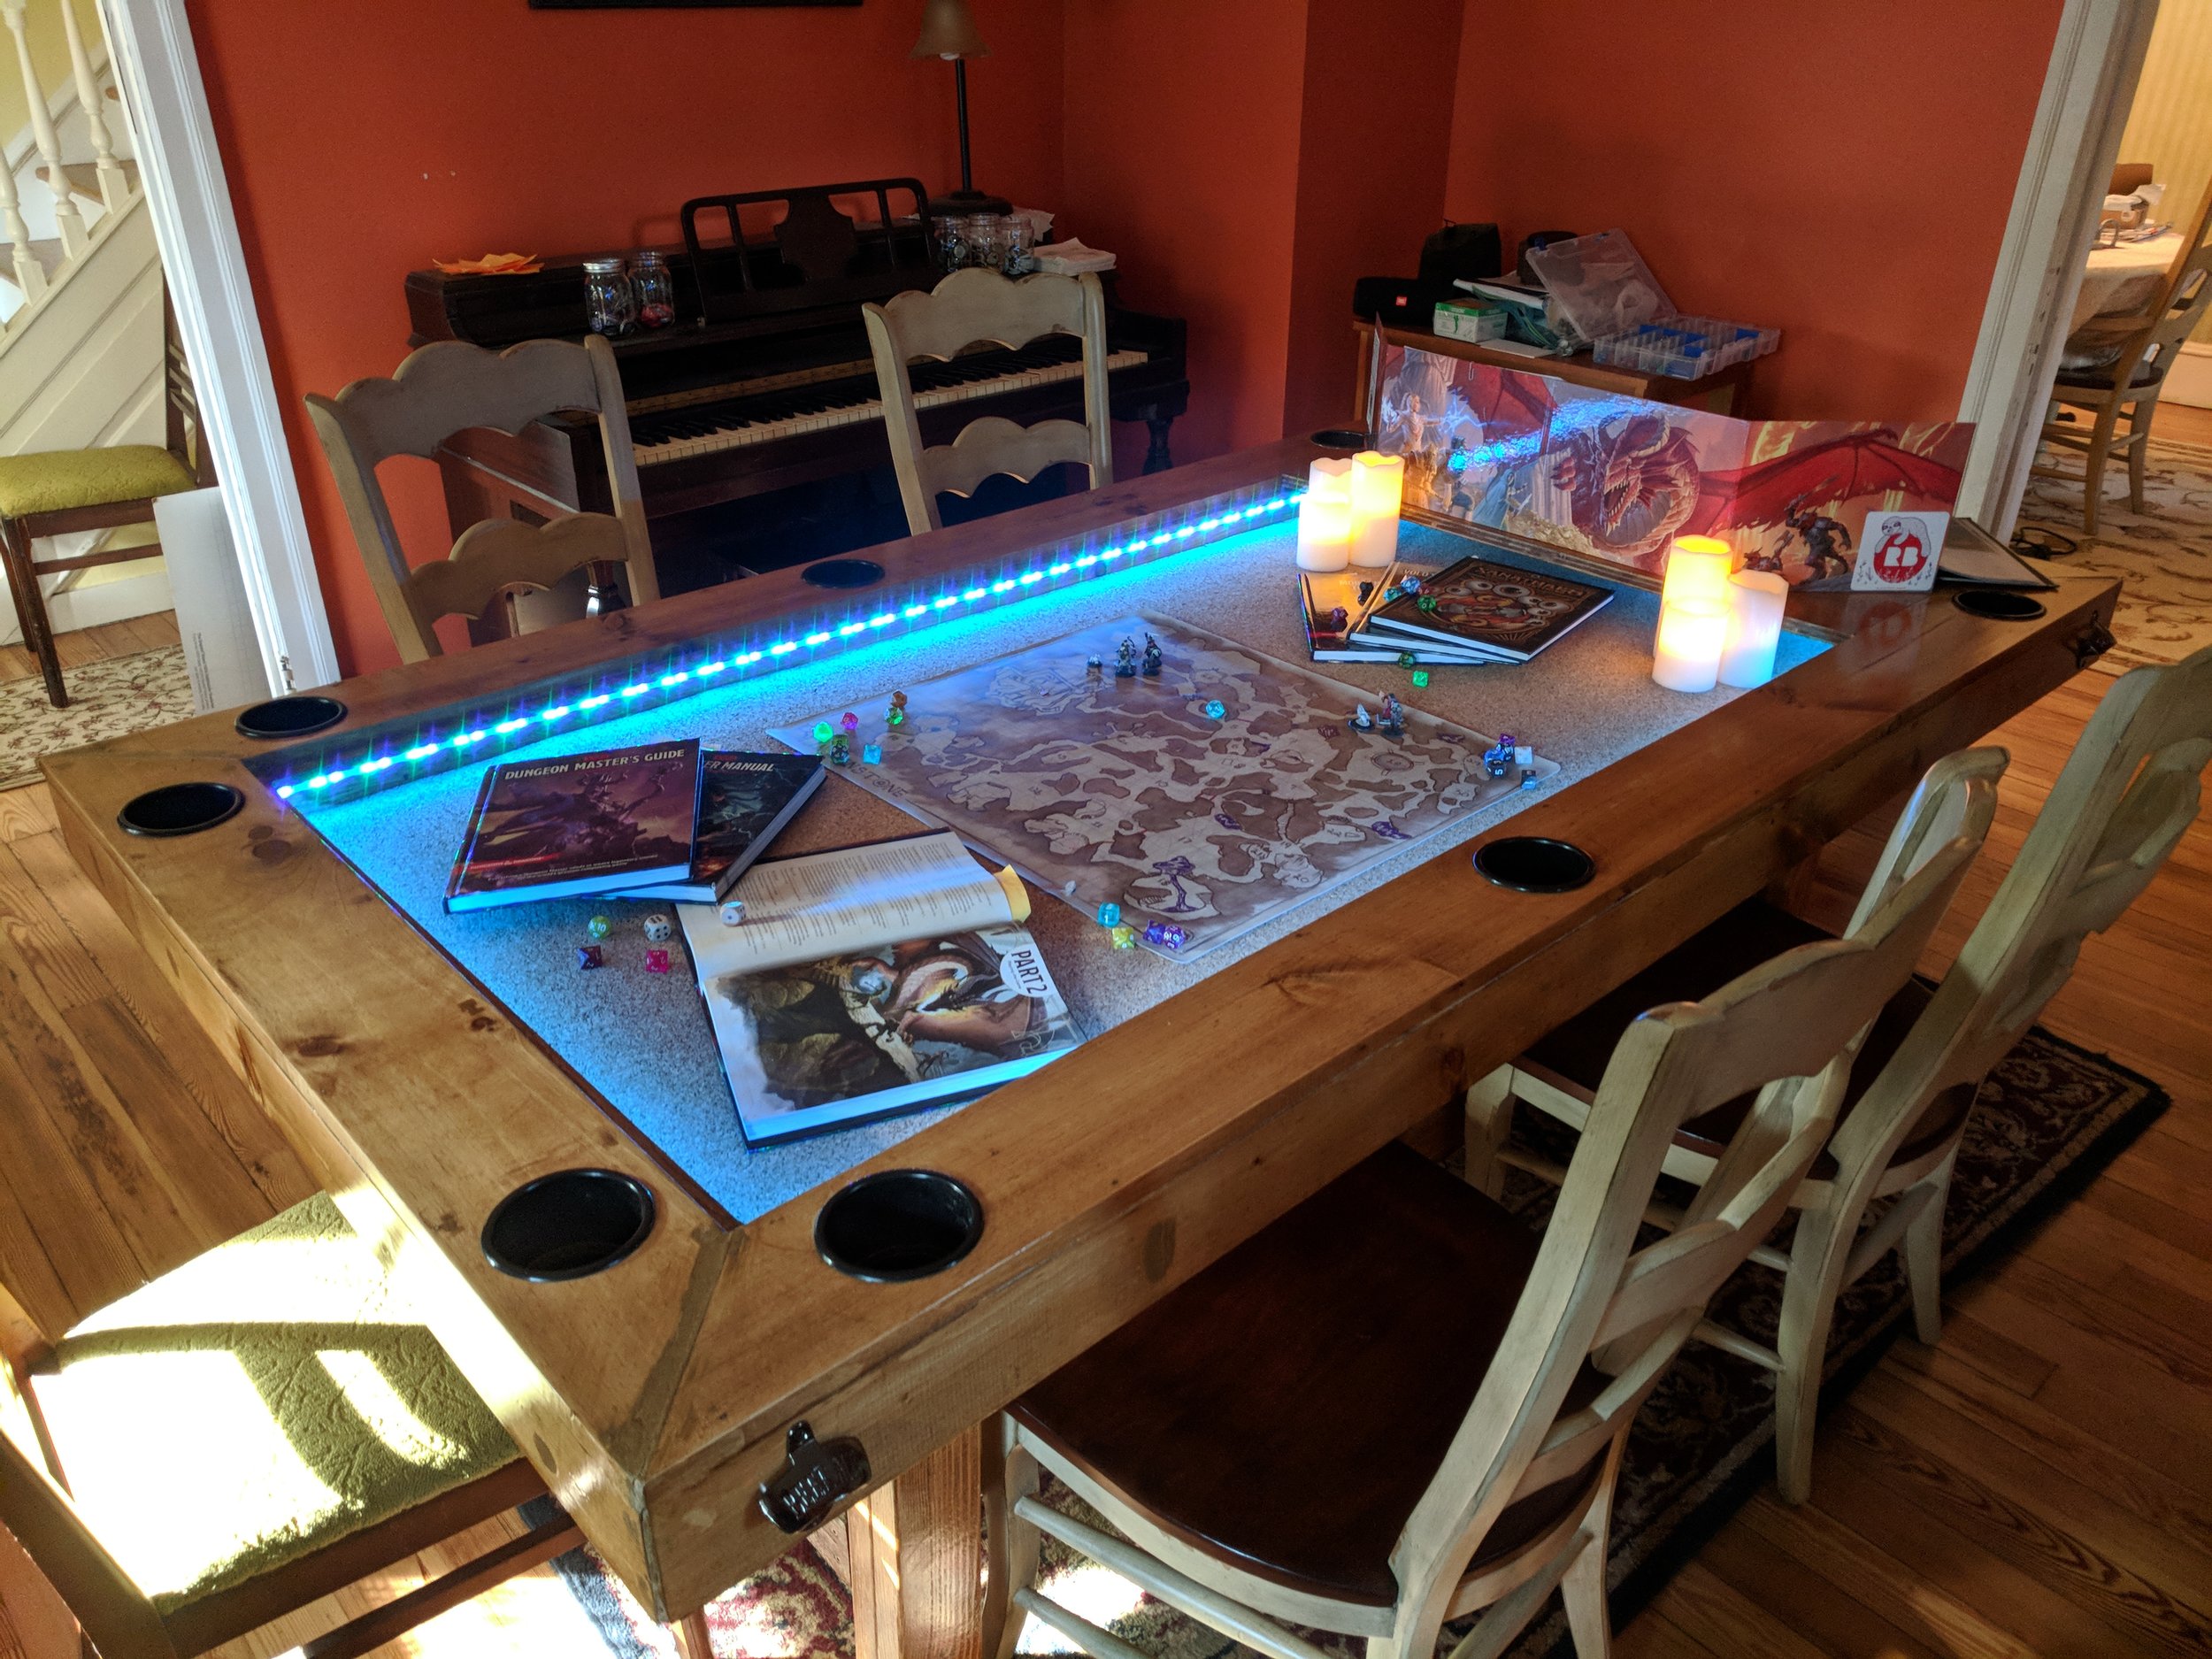
Here is the finished product, all the bells and whistles added

IMG_20180812_175717.jpg
IMG_20180812_175759.jpg

I put two chairs on each side for the picture here, but it easily fits three to a side with two on each end for a total of eight people comfortably around it. Eventually my plan is to make a pair of benches for the long sides and get a few interesting looking chairs for the ends. Until then, I'm just using chairs from wherever in my house..

IMG_20180812_175829.jpg
IMG_20180812_175937.jpg
IMG_20180812_175958.jpg

All in all I'm pretty happy with the way it came out. It's very sturdy, looks pretty much how I envisioned it, and will suit my gaming needs perfectly.

Now I just have to do something about the rest of the room around it. . .


Link to the youtube video with plans that I followed: here

These can also befound in the description of the video:

Link to the cupholders: here

Link for bottle openers: here

Link for LED's : here (note here: They cost me 24 bucks of a supposed original price of $138. They have an expiration timer on the sale, but it said the same thing when I bought them three weeks ago, so I think it's just bullshit to make you buy them faster.)

Experts Announce: The Last Fucking Thing Now Has Its Own Festival

shutterstock_695460199.jpg

Over the weekend, a report was released by top data analysts in at the Bureau of Street Festival Census Collection stating that, with the creation of the 'Flip-flops and Socks festival' in southern Rhode Island this August the last fucking thing there was now has it's own festival.

Gregory Dermond, spokesperson for the SFCC had this to say:

"That's it. There is literally not a single fucking thing in existence that doesn't have a goddamn shitty street fair associated with it now that those ass-backwards cockwads in Rhode Island started a festival in honor of wearing socks with flip flops."

Experts had long been concerned with the finite quantity of subjects upon which a poorly executed street fair could be focused by small towns with no other possible draw for outside sources of commerce.

"The last good concept for a street fair happened around 1997 and it's just been downhill from there. Around 2010, we really started seeing things take a turn for the worse as all of the good foods already had festivals in their honor somewhere in the country." Dermond laments "These fuckleberries started creating festivals for stuff that was a side ingredient to actual food at best. It's like someone in the idiot community released a memo that said if you can make a fucking shit flavored ice cream out of it, you can have a festival for it. Thus we started having to deal with shit like Pickle festivles, mushroom festivals and so help me fucking Christ Kale festivals."

2014 Kale festival in California. Attended by an estimated 15,000. Many attendees polled stated that they "loved kale" and were "excited that a festival centered around it had come to their town" with notably pained expressions on their faces. One a…

2014 Kale festival in California. Attended by an estimated 15,000. Many attendees polled stated that they "loved kale" and were "excited that a festival centered around it had come to their town" with notably pained expressions on their faces. One attendee is quoted as saying "Kale tastes like licking a taint and these people are full of shit."

It seems it wasn't until the last few years that street festival subjects really started to get bad or even downright disturbing in some cases, as the available number of topics dwindled increasingly lower.

"2016 was the year that everything in America really went to shit" Dermond tells us "The good stuff, hell, even most of the bad stuff was taken, so people started really deep diving into the depths of their shit filled, garbage imaginations for festival ideas. I remember, that was an expensive year with that 'Gasoline and Lit Matches' festival in Utah burning down most of the town. Luckily it was Utah, so who gives a shit, but even that wasn't as bad as the fucking Halloween ones we had to deal with that year."

Image from the Grand Rapids, MI 'Razor Blades hidden in pieces of fruit' Halloween street fair.

Image from the Grand Rapids, MI 'Razor Blades hidden in pieces of fruit' Halloween street fair.

"It's not surprising. It's like everywhere you turn somebody is throwing another festival about something nobody gives a fuck about. I actually had to move after I got trapped in my house for seven weeks while my street was closed for twenty four consecutive street fairs last summer." Said one woman when asked what she thought of the fact that the very last thing in existence now finally had it's own associated Street Fair.

Shot from the Short Lived 'Tasteful Renderings of interesting bowel movements' Art festival

Shot from the Short Lived 'Tasteful Renderings of interesting bowel movements' Art festival

A different perspective perhaps is held by Meghan Waters, a crafter and regular exhibitor at street festivals who makes scarves for dogs and humans out of recycled glass shards. When asked to comment on the Socks and Flip-flops festival she said "Thank God they've finally gotten them all. It was touch and go there for a while, but there are finally enough Street fairs that I don't have to get a real job."

What do you think of the official last street festival topic being taken? What festivals does your town hold? How do you get to work with 15-20,000 people on motorized scooters in the streets every day? Let us know! 

Fart Torture Story

I use Squarespace to host this website, and every now and again they roll out some new feature that people with significantly greater understanding of how to properly run and grow their sites undoubtably find extremely useful.

The newest thing I've received an email about is Google Search keywords as part of their analytics services.


While I mostly don't concern myself with site traffic, search engine optimization and other such things that are important if you're trying to monetize your site or fuel a desperate need for validation (he said, as if a desperate need for validation were not the driving force behind everything in his life), I'm sure it's a pretty handy little resource, and I'm at least curious enough to play with it once.

Let's take a look at what key terms Google thinks I should be using to really get my content out there. What is it that the people of the internet want to see?

Here are Google's top ten reccomendations for key words and phrases I should use to increase my website's visibility:


Google. . . What the fuck.

Internet. What. The. Fuck. 

Clearly somebody is doing something very wrong in this scenario and frankly I'm not sure who it is. Either it's me, and I need to take a long hard look at the content of my writing and possibly my character as a human OR it's Google and they need to get someone to review the code for this analytics thing.

The third option, of course is that the real fault here lies with the society who psychologically damaged a generation of people so badly that a computer which learns from our search history, having all of humanities collective curiosity at it's disposal can only come up with Horse Fart Fanfic.

Its official, we've run this one into the ground, time to start a new civilization. 


Before I go I'd just like to quickly address all of the folks currently reading this who stumbled in here on accident while looking for fart torture fanfiction. Hey, hows it going? Welcome to my website.

Before you click away let me just apologize that the title was a misdirect and that you came here looking for tastefully written short stories presumably involving someone being forcibly held down and farted on (with or without horses) but instead got nothing but lightly mocked. It was nice to have you in any event, I hope you find what you're looking for at the next website you try.

And hey, maybe once you finish up masturbating or whatever come on back and take a look around, maybe you'll find some of my posts here pretty funny. After all, according to Google my content is pretty well geared towards the fart fetishist demographic. Who knows, maybe you'll expand your horizons and you'll be able to use the internet for two things from now on, neat!

DRUNCOT

Druncot bumper.jpg

One of Walt Disney World's Parks, Epcot features something called the World Showcase. The World Showcase makes up the back half of the Epcot park and is a big loop which circles a lagoon and features eleven individual stops, each themed after a  different country. Each stop contains buildings which have been given facades resembling classical architecture from their respective countries which contain shops, restaurants, shows and even some rides themed around the culture of the area.

epcot_worldshowcasemap-300x258.jpg

Specifically, one thing you can get at each of the World Showcase's eleven stops is an alcoholic drink or cocktail native to that country. Because this is America, and when we are presented with anything even remotely resembling a gauntlet of culturally stereotypical bullshit and drinking, we roll up our sleeves and get ready to represent ourselves poorly to people of other nationalities, an immensely popular custom known as Drinking Around the World exists.

Drinking Around the World is a time honored tradition where you go to Epcot and attempt to get one drink at all 11 countries in sequence within a single day.

The last time I was at Disney world I was maybe 17 and thus not old enough to participate in the challenge unlike my cousin, who at the time was also underage, but managed to get a beer at the Germany portion of the showcase by hitting on the native speaking server in fluent German. Though only technically a drink at one stop, he was at least participating in the spirit of the occasion by doing something which objectively speaking is morally questionable but is kind of awesome. Returning as an adult I decided it was time to undergo my rite of passage as an obnoxious American, and get tremendously drunk at Epcot on overpriced culturally thematic alcohol. I was going to drink around the world so that my wife could photograph it and I could write about it later.

Thus Druncot 2017 was born.


MEXICO

It was at the very first stop of the day that I discovered I had made several key mistakes in my drinking around the world preparations.

  • Mistake number one: I had gotten so used to paying for everything with the braclet they give you to charge things to your room that I had neglected to bring my wallet to the park that day. If I wanted to even attempt this, I was now going to have to force my wife to buy my booze for me like a delinquent teenager. Not off to a great start
  •  Mistake number B: By the time we finished with the various other Epcot attractions and got to the World Showcase it was already 3:30pm and we only had until 6:00pm until our dinner reservation, meaning due to poor planning, I had inadvertently given myself about two hours to complete all 11 stops before we had to start walking to get to dinner.
  • Mistake number the third one: Apparently it is quite traditional for challengers to the World Showcase to accessorize for the event. There were dozens of groups there wearing matching shirts that said things like "Drink, Drank, Drunk" or "Bippidy Boppidy Booze" on them. I did not come into this event with the coordination or pre-preparation of these other people. While they had a color matched support team of co-participants all I had was one disapproving wife that was annoyed she had to buy my drinks for me. 

It was at this point that a decision would have to be made. Realistically, I had come with no I.D, had given myself about a third of the time I should have, and was woefully unprepared in the insufferable t-shirt department. The smart thing to do would be to just write it off as a poor job planning and enjoy the rest of the day at Epcot as normal rather than spend a ton of money and likely make myself sick. It really made the most logical sense to just forget the whole thing.

Or...

Fuck it; frozen strawberry margarita in Mexico and we're of to the races. 

I got massive brain freeze because they don't allow you to ride the Three Caballeros boat ride with a full beverage for some reason and I had to chug the last 2/3 of it.

NORWAY

IMG_3762.JPG

A the second stop, Norway, I came to the conclusion that due to how short a time period I was trying to cram this world tour into, volume might become an issue. It was going to get real gross if I had to drink something around 12oz of liquid at every single stop. To conserve space, I decided to get a shot. Because I'm smart like fox.

This was a liquor from Norway called Linie Aquavit. I saw it described as being similar to vodka. I clearly am no type of expert on alcohol but it was urine yellow, tasted like eggnog and went down like fire which is distinctly noting like vodka in my experience. Considering that it's a drink for people who live in longhouses and are vikings* I guess it was fine.

*I know nothing about Norway

CHINA

IMG_3769.JPG

In China, I had a Tsing Tao beer. Tsing Tao I believe is Chinese for "Tastes like generic beer". That was culturally insensitive and I apologize. The fact that I'm an unsophisticated piece of shit doesn't mean I should be disrespectful to the language.

(The beer was mediocre though)

GERMANY

Up next was Germany. By this point I was starting to feel the first three hit me. I was feeling pretty good, but doing the math and realizing I'd only made it about a third of the way through I was starting to get a little worried that I'd misjudged how much time I was going to need to make it through all 11 stops.

Still more concerned with the volume of liquid I was putting into myself rather than the alcohol content (because I'm smart). I decided to get a shot here too. We were on a schedule here people. Mix those alcohols up in the stomach and get a move on.

This was some sort of honey flavored bourbon from Germany and it might have been the best of the drinks I got that day. I got too drunk to remember to write it down so I could look it up later though.

ITALY

  Ah, Italy, the home of my people. I do of course use that phrase loosely, unless they open an exhibit in the world showcase for the People's Republic of New Jersey this is as close as I'm going to get.

You know what is a great follow up to mixing a bunch of different beer and liquor in your stomach over the course of an hour? Sangria. They had nothing but wine at the drink pavilion in Italy and I hate wine, so I settled for wine Jr. I don't know if it was the alcohol I'd already consumed continuing to hit me, the addition of more alcohol, or the infusion of yet a third ingredient in the devil's mixture I'd already put into my system, but things started to go off the rails in Italy.

First, I waited about ten minutes to get in and take a picture in what I think was supposed to be a glamorous pose, sprawled lavishly across the base of this fountain of Neptune. The result, as you can see looks more like I'm the worlds shittiest mime, pretending to fall in slow motion into the fountain while also drinking something that tastes like dish water. After that I decided that I was getting too drunk and needed to soak up some of that alcohol. Positive that it was well known that cannoli are the best absorbents of alcohol to help slow the decline into ruin I insisted on getting one in order to do damage control, I guess?

It was a good cannoli, though ineffective.

AMERICA

IMG_3777.JPG

America. Land of the free, home of the Atlanta Braves and producer of some of the shittiest shit beers on the planet. By the time we reached America, the halfway mark for the World Showcase I was in rough shape. I had consumed a margarita, two shots, a beer and a glass of sangria between the hours of  3:30 and 4:45 and was nearing a tipping point. 

By tipping point I am not referring to a physical limitation of my body to consume alcohol, I mean a point at which I would no longer be able to maintain the composure to pass off as a sober, casual attendee of a theme park where people bring their small children. I don't condone dangerous binge drinking, I was never going to drink an amount I felt was unsafe, but we were in Disney goddamn World, I also don't condone drinking to a point where you become a sloppy piece of shit that everyone around you has to deal with. Especially when there are about twenty four year olds who just saw Donald Duck for the first time and don't need that shit ruined for them by some idiot stumbling past yelling in a bad version of the accent native to whatever country he just came from.

Perhaps it was fate that interceded on my behalf that day, because as it would turn out, one of the kiosks at America was closed; the kiosk that sold a selection of craft beers from breweries around the country. This, meant that my only option for drink in America was Coors Lite. Coors lite is to beer as a bunch of pool noodles tied together with shoelaces is to a high end speedboat: Sure it's technically in the same category but the only situation in which you choose one over the other is if the alternative is that you die at sea.

I may have decided to try and go for a few more stops, if anything even remotely enjoyable had been available at America, but that Coors Lite defeated me. There was no way I'd make it to the end with only one more hour to go and retain enough composure not to become an embarrassment to myself and my poor wife who was dutifully putting up with all of this like a trooper.

That trash water drained me of any remaining resolve I had to continue the Druncot challenge, much as I imagine it drains millions of other Americans of their ambitions on a daily basis. The unrivaled shittiness of that Coors had me asking "What's the point?" Indeed, what was the point of anything? If beer could be this terrible, was there really anything right in the world? Probably not.

And so, after six stops on the World Showcase, Druncot 2k17 came to an unsatisfying and anticlimactic end.

IMG_3777.jpg

While my shot at Druncot glory may have been cut down in it's prime by poor planning and the ability of the good people at Coors to make and distribute the worst beer known to humans, it just means that for the future, I'll be armed with the lessons learned in my first attempt.

Some day I will return to Disney World as a Magnificent Conqueror and on that day I shall write another shitty blog post about it. 


Authors note:
Because I feel like it should be included; The above was done for fun, and written about in a joking manner, but at no point would I have allowed myself to go beyond a limit where I would have put myself or someone else in danger. 
The entire reason I stopped in America was that it would have been irresponsible to continue on just for the sake of having a complete adventure to write about later. I stopped well within my limit for conducting myself appropriately and I would never condone anyone doing something unsafe.
In short, alcohol is for people who can handle themselves like adults. Don't be an asshole.

Man vs Machine. The Quest For 10 Bucks.

While we were at Disney I somehow found myself signed up for an interactive scavenger hunt as part of the new Avatar themed section of Animal Kingdom that they opened up. This scavenger hunt was orchestrated through Facebook messenger by an auto-responder bot that was going to donate ten bucks to a conservation cause of my choosing if I participated.

Never one to turn down a good old fashioned ten bucks, I figured cheating the system while we ate lunch in the park was a worthwhile use of my time. Let it not be said that I didn't get a free ten bucks when it was offered to me. In the immortal words of Lemony Snicket; 'free', dear readers, is a word which here means in exchange for access to my personal information which was promptly turned around and sold to advertisers for a small profit.

I they're going to sell all my internet habits to an advertiser I figured I could just beat the system, pretend I was finding all of the stuff they wanted me to find and get them to adopt a South American Tree Frog in my name or something.


I'm not entirely comfortable that this chatbot has the ability to lie but it's 2017, I'm no robotist. Fitagami Bangarang clearly didn't feel comfortable admitting she was a computer program to me, who am I to call her out?


Challenge accepted Fluttershy Baccarat. And by challenge accepted I mean I'm not going looking for your weird wicker art project. I'm going to use my superior human abilities of deciet to make you think I found it and donate that sweet sweet ten bucks for orphaned sea urchines or whatever.

 
ai3.PNG
 

Clever girl. Demanding proof of my successful scavenging and or hunting. Spoiler alert I didn't actually go find the thing you wanted me to find.

Fisty Barberra was not going to let me bullshit my way out of finding that prop. My mere human brain was no match for her synthetic powers of deduction. The only thing left to do was to come clean and hope she didn't call down an orbital strike to vaporize me for my deception.


Ok, I'll admit things went a little off the rails at the end there. At least I still got my 10 bucks. 

 
unnamed.png
 

I think we can all agree that my master stroke of AI trickery was worth it in the end. Looks like I've single handedly saved the coral reefs. You're welcome ecologists of the world. Your welcome.

Didney Worl

Where do you go on vacation when you are a grown man with maturity of a seven year old? That's right, you go to the happiest goddamn place on Earth. Disney World.

Disney World is a pretty polarizing place in my experience. Either you completely buy into the whole schtick they are selling, or you don't. If, like me, the Disney thing works for you, as soon as you set foot in the resort you instantly become a little kid again and your childhood comes to life before your eyes. If it doesn't, Disney is like the DMV banged commercialism and their offspring is 27,000 acres of standing in line for hours on end in 114 degree weather while having your wallet gouged by a cartoon mouse. 

 
IMG_3695.JPG
 

Like I said; whatever corporate sorcery Disney has woven into the fabric of every aspect of that place, it locks on like a homing missile to the one bright spot in the deep dark parts of my otherwise cold, dead adult heart and pumps me full of molten nostalgia. We walked into that park on the first day at exactly the right moment for a full on parade to come cavalcading down the street as if it had been put on just for us. Standing in the midst of that parade and looking at that statue of Walt Disney and Mickey holding hands I got legitimately emotional. A thousand goddamn strangers in the street around me and I'm trying to pull it together so some poor six year old girl doesn't forever associate Mickey Mouse with a grown man crying at a fucking statue.


You know what though? Coming from a person who thinks parades are the worst form of entertainment invented by mankind, that parade was fucking magical and I'm glad we saw it. 

The next four days were spent park hopping, going on rides, eating ice cream shaped like Mickey and generally doing all the things you do at Disney. Here's the highlight reel in picture form:


IMG_3686.JPG
 

It's a small world. Famous for being complete shit and sort of culturally insensitive. A ride that literally everyone rides ironically when they come to Disney. A ride that is in fact kept running by Disney ironically at this point. A ride that my father-in-law fell asleep on when in 1995 when a four your old Emily made him ride it over and over again. In keeping with tradition I grabbed a quick nap while sailing through the darkness as a hoard of terrifying child robots screamed a song at us.

 
IMG_3690.JPG
 
IMG_3904.JPG

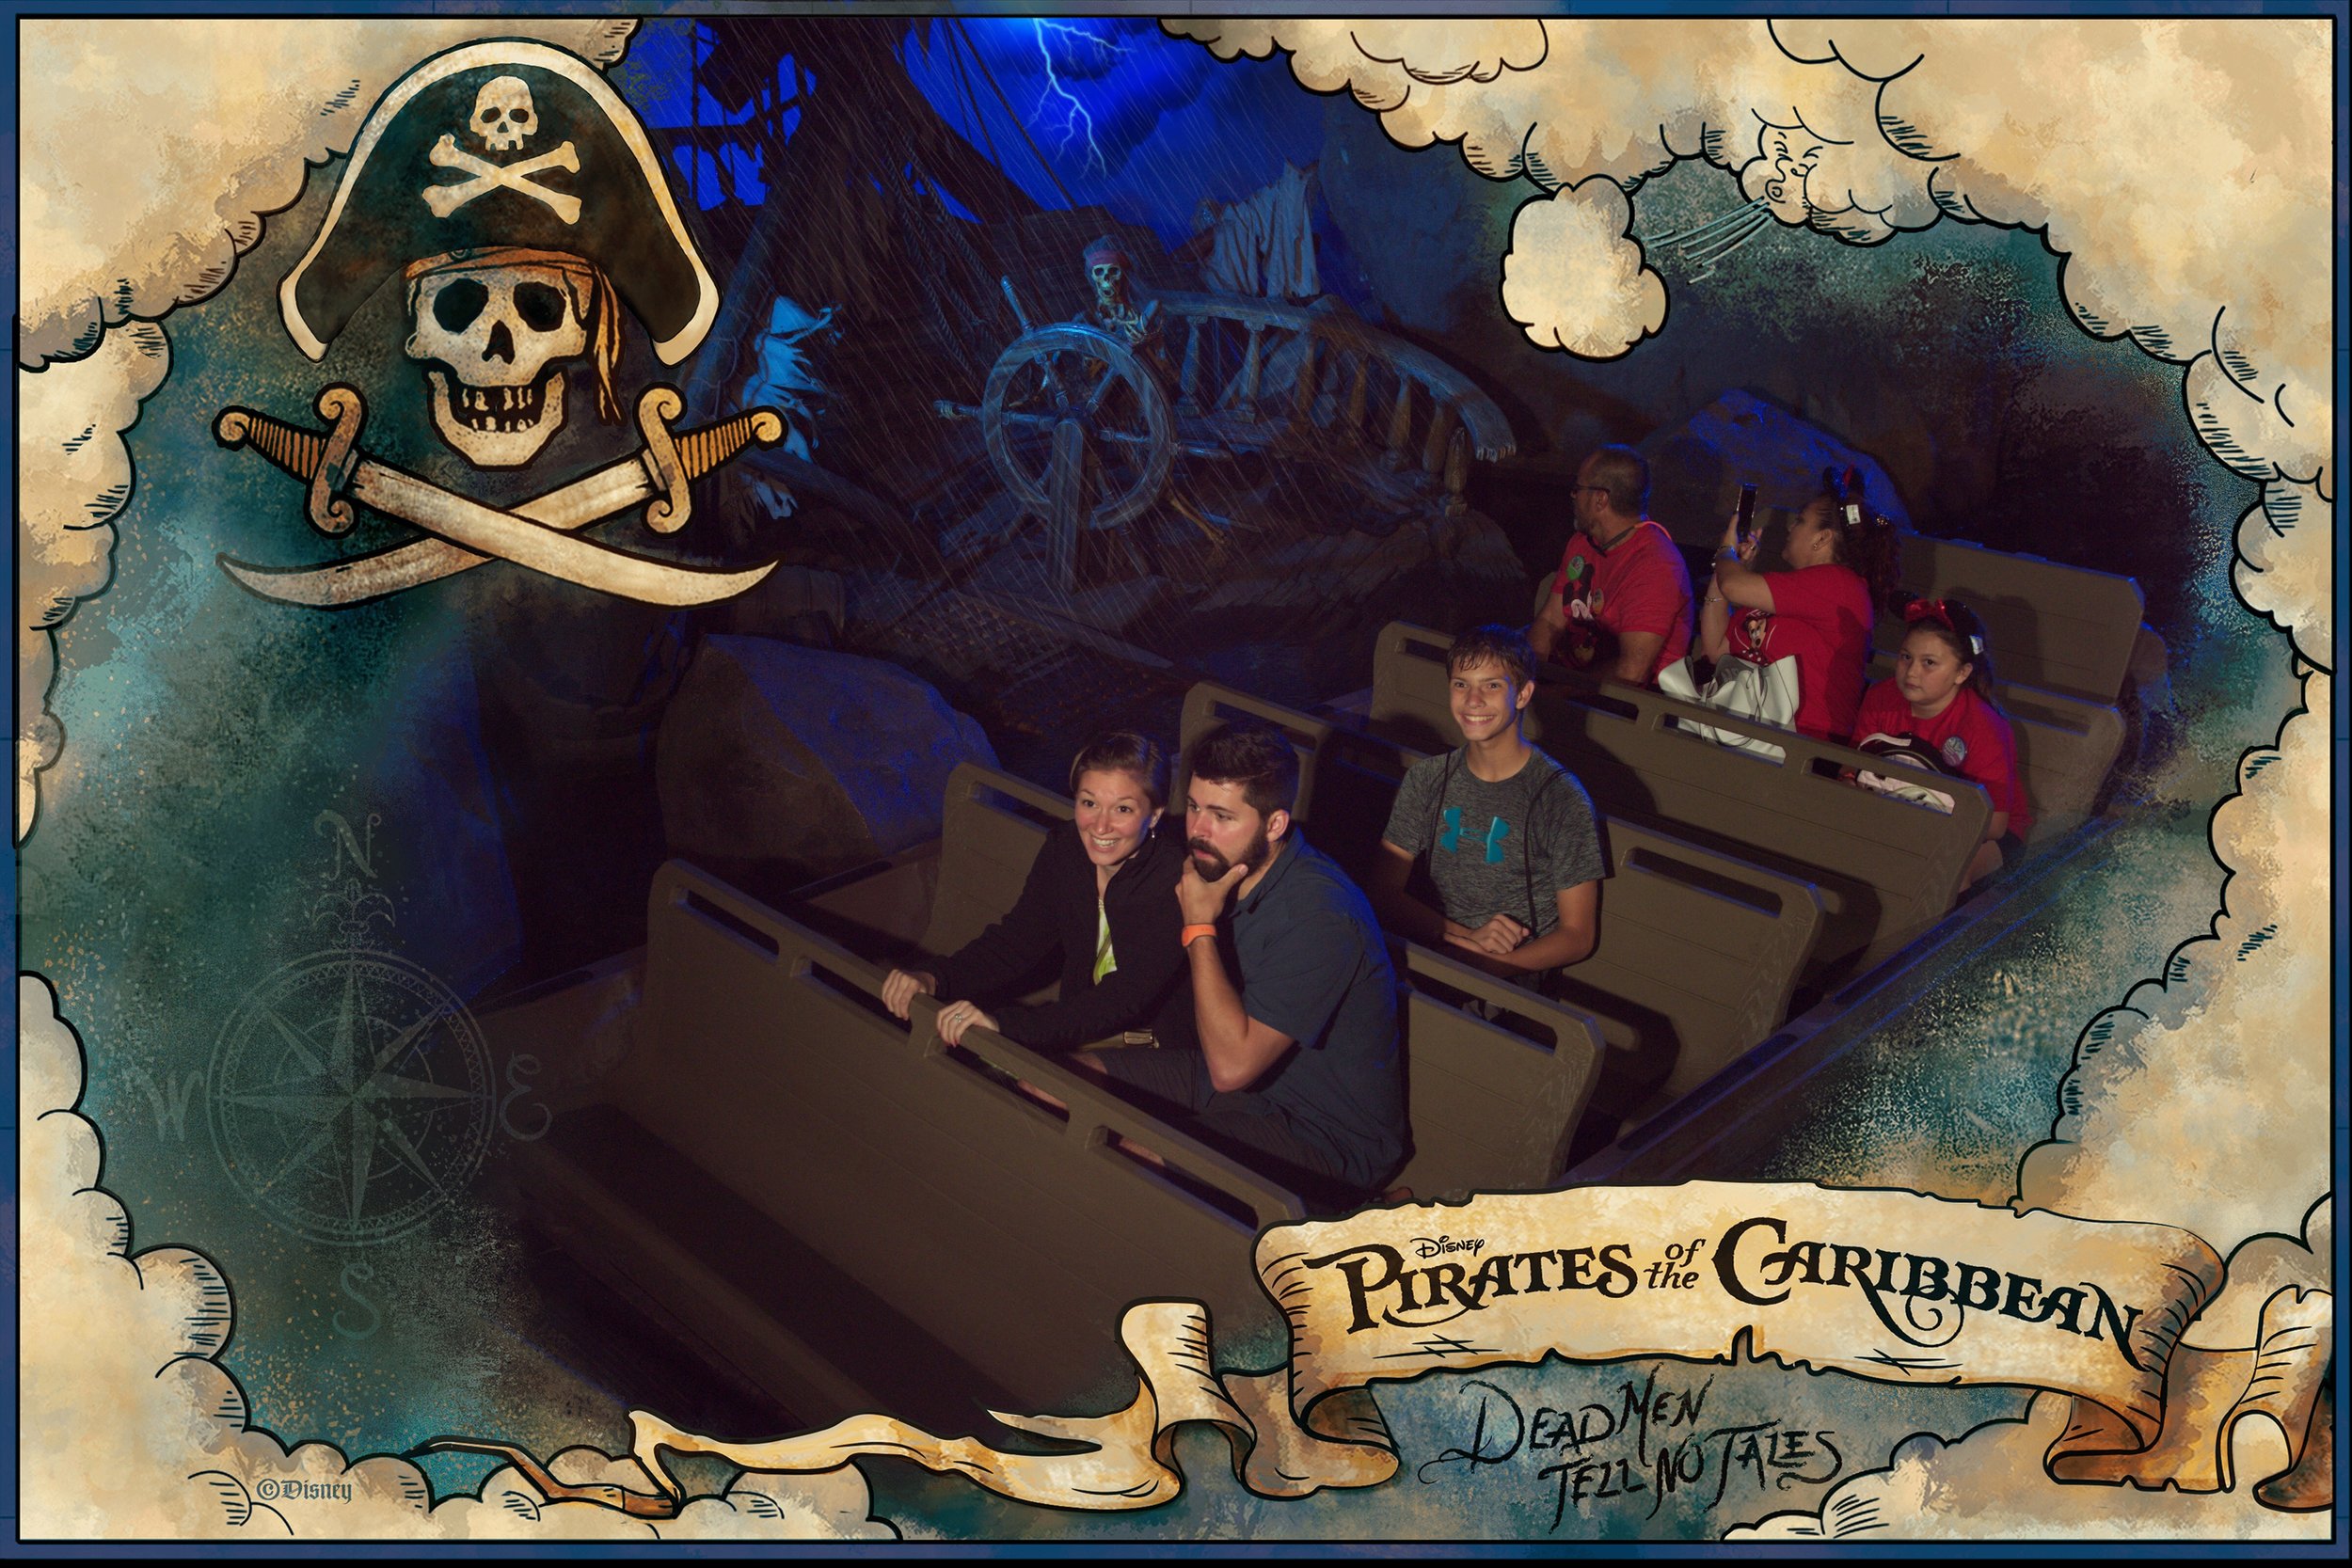
Another Classic, Pirates of the Caribbean. I am, apparently in the midst of some sort of deep, intellectual contemplation at the moment this picture was taken. But more importantly, look at that photogenic son of a bitch in the row be hind us. Kid just got on the ride all by himself, and took his fucking class picture for next school year in the middle of a boat ride through a dark tunnel full of animatronic pirates. 

IMG_3904.JPG

They have a system where you scan a RFID bracelet and automatically get sent your pictures. The lighting on this ride must have been weird, because if you look closely, the picture I was sent of Emily and I riding the Buzz Lightyear ride looks a lot like an asian man and his two small daughters. Weird.

 
IMG_3699.JPG
 

We ate at a restaurant called Be Our Guest on the first night. It's a restaurant in the Magic Kingdom themed around Beauty and the Beast. This is my wife's favorite Disney movie of all time, thus dining here was a requirement of our visit. We had to make the reservation for this place four months in advance because it's so popular.

IMG_3711.JPG
IMG_3710.JPG

Turns out there is a reason it's so popular. It's spectacular. You walk in to the dining room of this place and it's like you're in the movie. My wife cried a little bit. They nailed it so hard with this place I was surprised a candlestick with a corny french accent didn't take our order. Everything about the dining experience at this place was spot on, right down to the complimentary "grey stuff" they gave us for dessert because we were celebrating our Anniversary, which was in fact, delicious.

 
IMG_3723.JPG
 
IMG_3738.JPG

No big deal, nothing to see here, just a a bunch of fucking Stormtroopers marching through the streets.

IMG_3908.JPG

Tower of terror is one of my favorites, though I don't believe Emily cared for it. The empty seat next to that guy in red was a lady who noped right the fuck out of there about two seconds before the ride because she got too scared. 


On our second night we ate at T-Rex, which Emily picked out out of a sense of fairness. I believe her thinking was if I she got to eat in the princess ballroom of her childhood favorite movie and experience the magic of seeing Beauty and the Beast come to life in front of her eyes we should probably go to a restaurant for children full of robot dinosaurs and sound effects for my benefit. Altruistic dino-themed reservation making aside, apparently her ability to tolerate me does have limits. Limits such as when I get a 14 dollar beverage served in a fun glass that you get to keep afterwards.


 That picture just about sums up what it's like to be married to me, I think. You can really see the years being drained off her life in this photo.


Epcot is where we got the second best ride photo of the trip while riding Test Track. A ride where you rumble around in a little car and then they fire you at 60mph around a loop.

The greatness of this picture has nothing to do with either of us, but rather because of that lady in the row behind us seriously not giving a shit about anything.

IMG_3907.JPG

This may be the record for the least amount of fucks given while on a roller coaster moving at sixty miles an hour. Is she not enjoying her time at Disney World? Does she professionally drive those land vehicles that break the sound barrier and thus is not impressed by this ride? Is she just having absolutely none of whatever that white girl is doing in the seat next to her? Who knows? All I know is that when there are fucks to be given, this woman is fresh out.

IMG_3907.JPG
IMG_3825.JPG

An unfortunate naming cooncidence I guess.

 
IMG_3875.JPG
 

$32,000 crustal model of Cinderella's castle anyone? And speaking of Cinderella. We ate at the restaurant in that castle. . .

 
IMG_3903.JPG
 

. . . where they force you to take a picture with Cinderella herself before you can go in. Which is fine if you're a family with children but super weird and uncomfortable if you are two adults there by yourselves.

IMG_3903.JPG

The interlocked arms was Cinderella's idea by the way.

The inside of the restaurant was cool and the food was good, except the schtick at this place is that throughout the meal all sorts of Disney princesses come out to a bunch of fanfare and spend the meal going from table to table interacting with the guests. Personally I found it extremely difficult to focus on eating or having a conversation with my wife while constantly worried that I was going to get ambushed by fucking Snow White the moment I put a hunk of steak in my mouth.


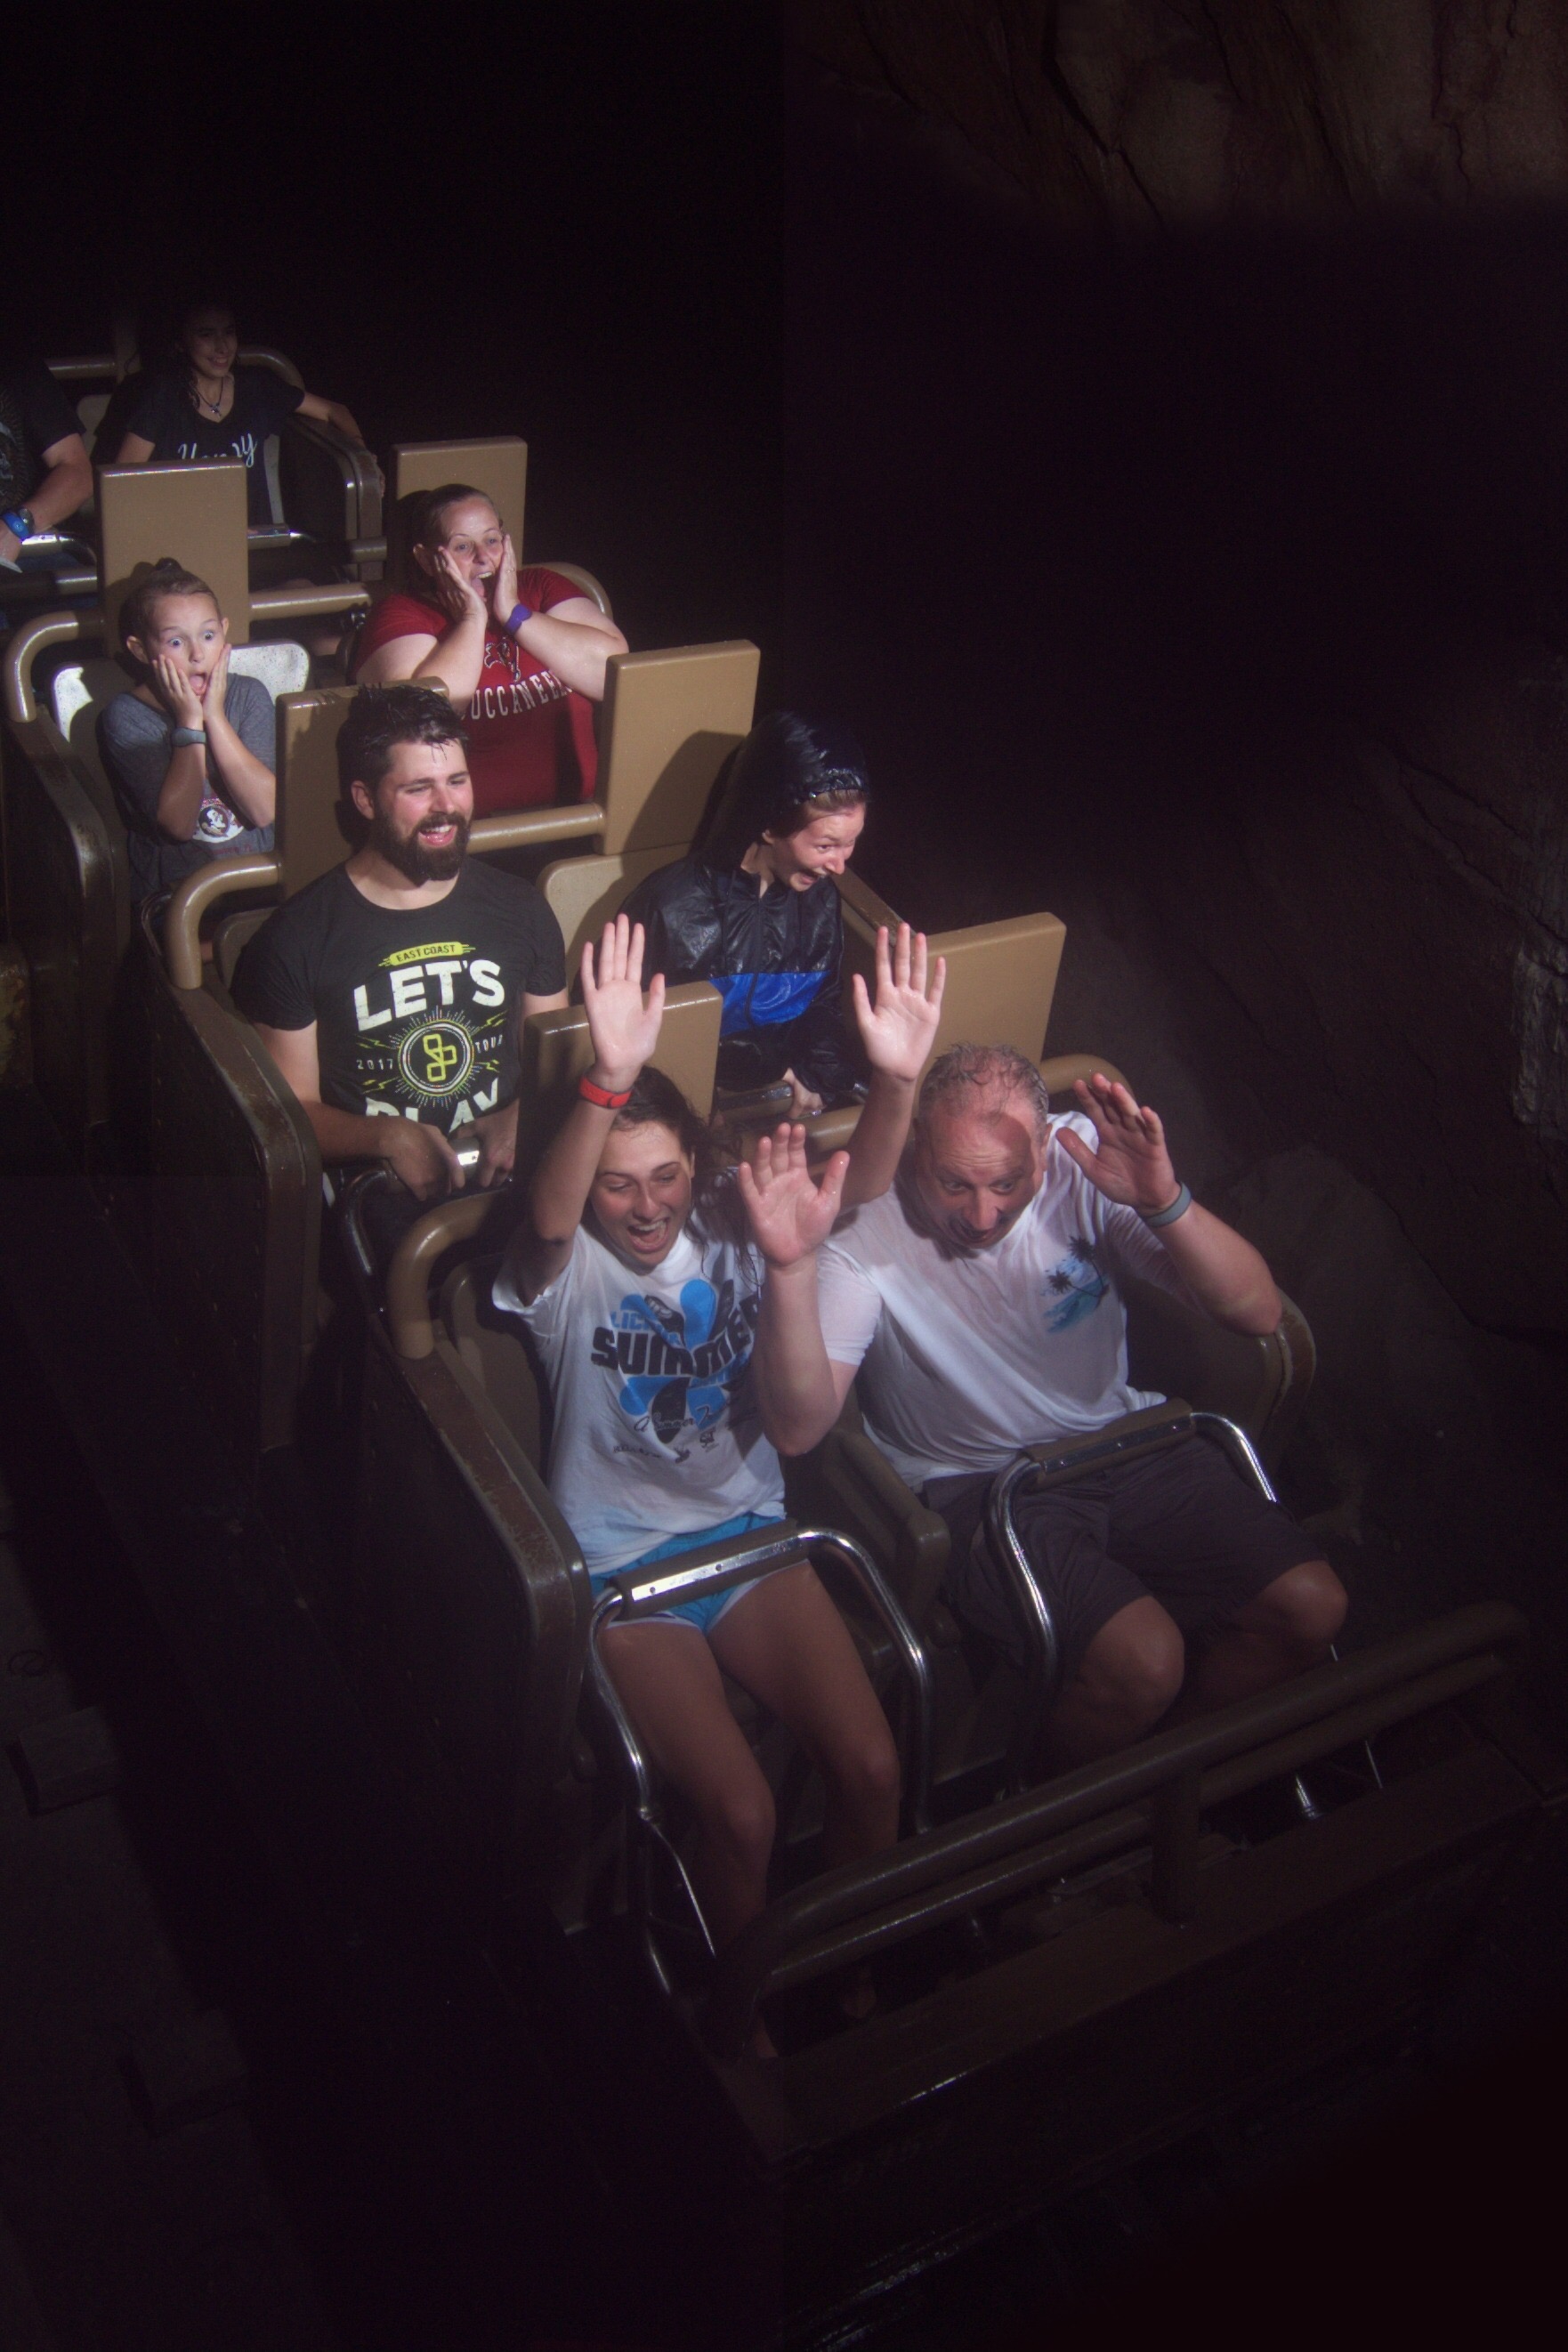
I mentioned the picture of She Who Gives No Fucks on test track was the second best photo of the trip. I've saved the best for last; An example of the diametric opposite of not giving a shit while on a roller coaster. This is in fact the perfect embodiment of giving all of the shits. This is a ride called Everest in the Animal Kingdom which we rode in a torrential downpour so bad you couldn't even lift your head during the outdoor portions of the roller coaster because the rain hitting you in the eyeballs at 150mph was so brutal.

A combination of terror at the roller coaster and the hilarity of how goddamn hard it was raining broke my wife and gave me the greatest gift I could have received at Disney. 

IMG_3905 (1).JPG

Perfection.

IMG_3905 (1).JPG
IMG_3905 (1).JPG
IMG_3905 (1).JPG

Glorious.